


-
Rewiring my '81 Epi Emperor T, and I'm mulling over the best way to ream out the control holes to accept USA CTS pots. I picked up this handy-dandy reamer which worked great on my Zephyr Regent, but with the thin body of the Emperor T, the point bottoms out on the back long before it gets to where it would ream the hole.
I've got a 3/8" drill bit, but it's a bit worn and don't trust it for this task. I could certainly get a new drill bit, but...is there something better?
Thanks in advance!
B.
Sent from my iPhone using Tapatalk
-
12-29-2017 11:35 PM

-
Never, never, never use a larger bit to enlarge an existing hole. Words can not describe the potential for disaster.
Get a Dremel tool and cut back the reamer you have so that it does not hit the back of the body. You will need a fiber reinforced stone cut-off wheel (or three) to cleanly get through the hard reamer.
Chris
-
I suspected as much. Have dremel/cutoff wheels/safety glasses. Guess I'll pick up another reamer in the future.
 Originally Posted by ptchristopher3
Was hoping there's a 3rd option, but I can live with this.
Thanks.
Sent from my iPhone using Tapatalk
-
If you are VERY good at this sort of thing you can also use the dremel to simply enlarge each hole. But that also presents some possible disaster unless you are very used to doing that sort of thing and know how the bit can grab in the existing hole and start to do remarkable acrobatics on you.
Slow careful reaming is the way to go. Also consider beveling the finished surface of the top slightly so you do not grab and chip the finish while reaming. Just bevel slightly past the actual hole size you will end up with.
-
If you have a hobby store nearby that caters to the r/c airplane hobby, see if they have a “prop reamer”. These are stepped and should work with your thin body clearance.
-
I'm not sure what's in my dremel kit that would work for that, but I've got one of those variable speed dremels you can throttle back a good bit. Originally Posted by ptchristopher3
Might be worth a run to the hobby store and see if there's something for this.
Thanks again
Sent from my iPhone using Tapatalk
-
Chuck a dowel in your drill. Wrap the dowel with sandpaper. Carefully enlarge the hole by moving the spinning dowel in a circular motion. Works well without danger of a catastrophic “bit bite”. The holes won’t be perfectly round but no one will ever know but you (and us!). This works for peghead hole enlargement as well. Not elegant but works safely. Just don’t overdo it.
-
It's possible to use sharp drill bits for this. Not with power tools, but carefully, by hand. Some small locking pliers can provide enough torque. It's not fast, not as easy as a reamer, and you may need mulltiple sizes to get to the eventual size. It's not my first choice, but it's possible if that's all you have. I certainly wouldn't try this in a drill.
-
Thanks for the suggestions folks. There'll be a store run tomorrow morning...lol. Not sure if that hobby store I'm thinking of would have a prop reamer (sure gonna ask), but they do have a whole mess of dremel bits.
The trick with the dowel/sandpaper is certainly plausible as well.
In the meantime, I've been playing with the soldering iron again. I'm going to leave the original harness intact, so I used the Switchcraft toggle left over from rewiring my '92 Les Paul Studio (short and gold). Should work a treat.
I'll put the caps (Vitamin Q paper in oil) in tomorrow. Ima a calling it a day. Nite all!
B.
Sent from my iPhone using Tapatalk
-
I had to do the same job on my MIK Riviera and I used a wooden stick wrapped with sandpaper and enlargened the holes. Although I did it by hand - takes time but reduces the risk of overdoing it. Originally Posted by rolijen
-
Might not be good form, and not a recommendation really - but did this on my Ibanez AS103 using a suitable round section file. I stuck masking tape over the holes to be enlarged, with the correct outline of the bigger holes I wanted marked on - probably not strictly necessary, but it helped to get a more accurate-looking result.
-
Lovely looking work, a pleasure to see that! Originally Posted by Brian B
-
Yup, that's the correct way of wiring, very nice!
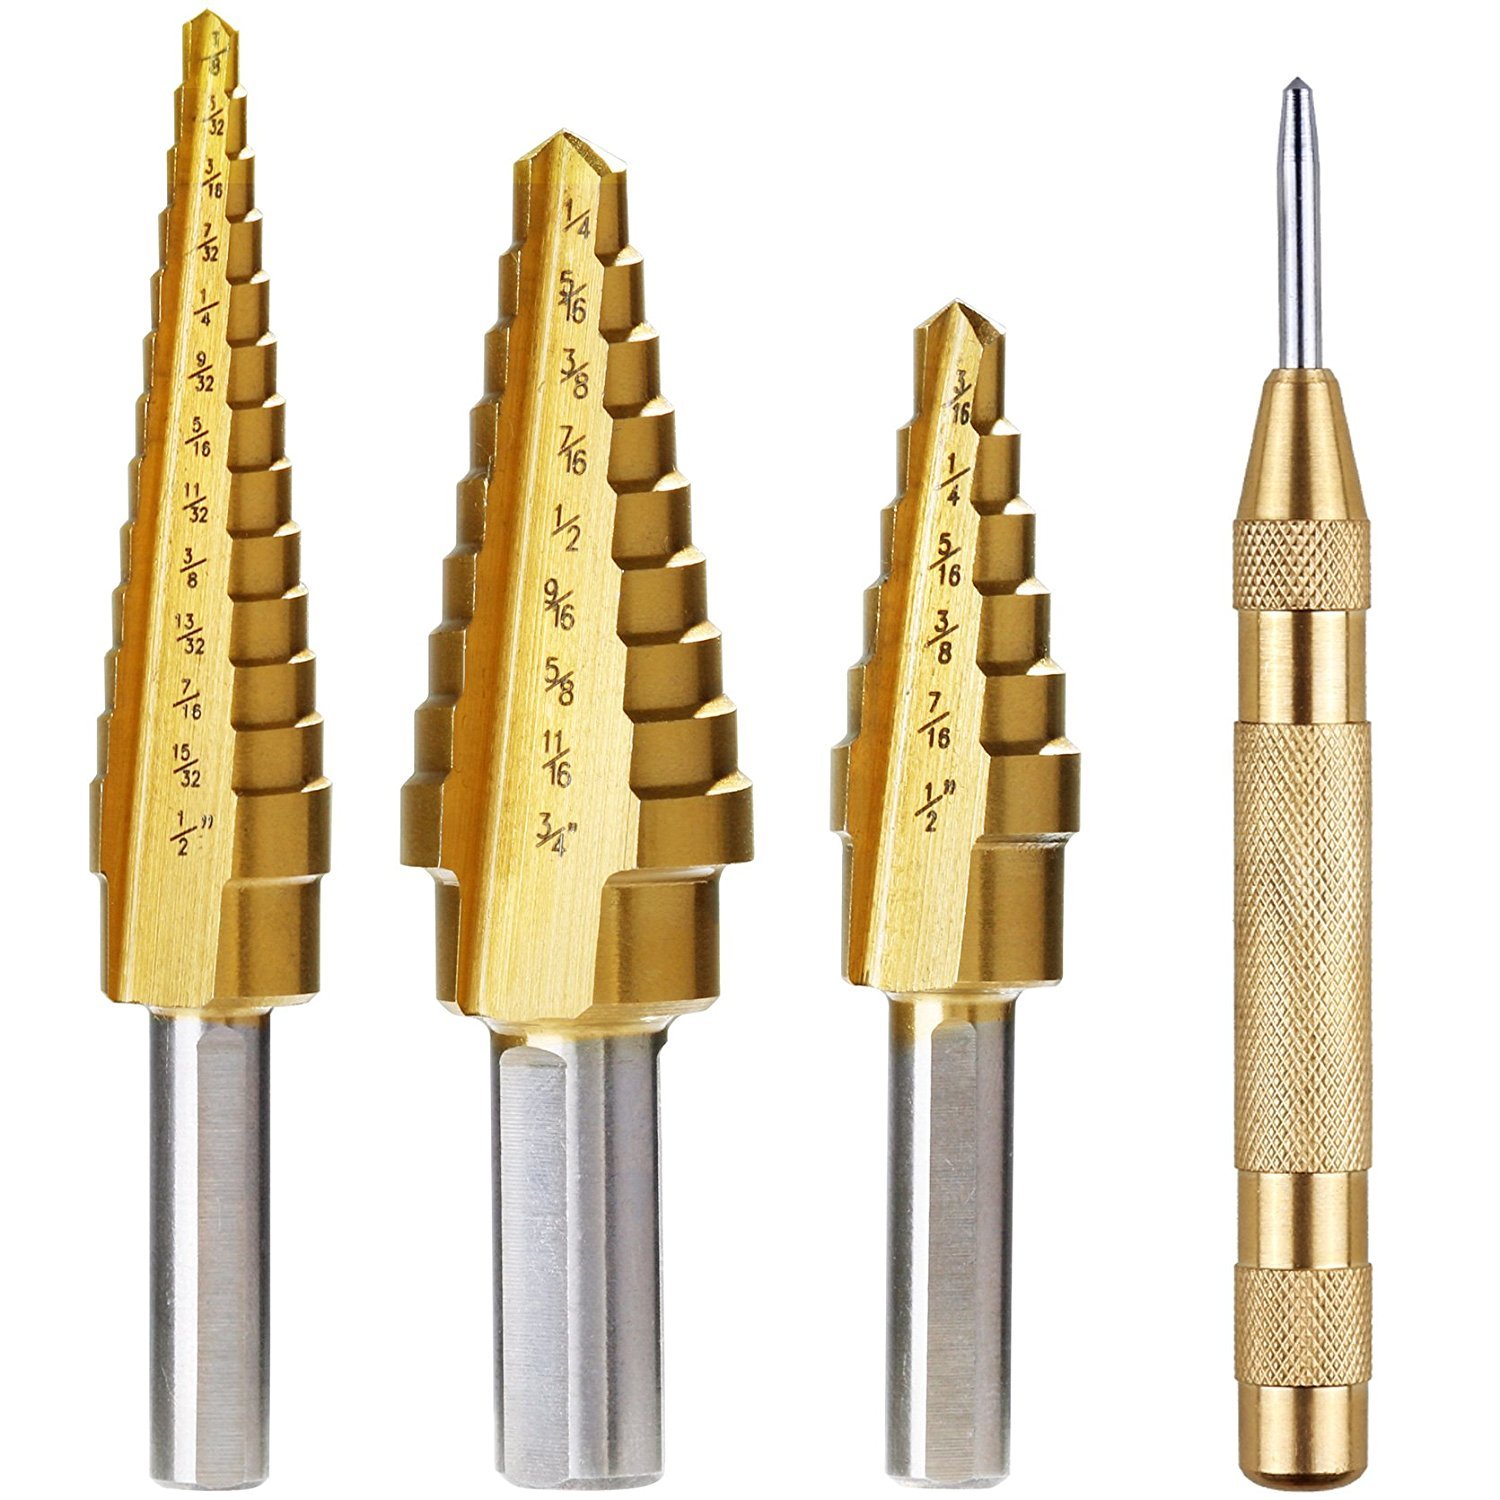
For reaming the holes: had to do the same on my Ibanez AF55. I used one of these bits:

The bit will nicely do an outline and the first 1/3 or so of the hole, creating a 'template' for the rest of the hole that I finished with a small hand file with a curved edge, worked great. (The dowel and sandpaper trick seems great, I will try that next time!) The advantage of first using the drill bit is you keep the holes nice and round.
-
I use a Dremel to enlarge the control holes. I use a reamer when the hole center is crucial, for example model airplane propeller.
In this case not only did I Dremel the potentiometer holes (which took only a minute or so) I also enlarged the switch hole with the Dremel.
Yes, you wiring harness looks great...you are ready to start doing semi-hollow If you solder the items in-line like that, in many cases, you can feed them single-file through the bottom of a semi-hollow's bridge pickup hole.
-
I had success using these "as a hand tool" not with a drill.
Holding the bit with my hand, I went slowly and carefully clockwise and counter clock wise drilling the existing metric hole one step at a time. I did it on my Sheraton II when I upgraded all its electronics including full size CTS Pots.
-
I actually was thinking of a step bit like those this morning. I went looking about for dowel stock and sandpaper and might go that route, but will take a trip to the store to see what is there. Going to price this out as well. Originally Posted by vinlander
I don't mind spending a few $$ for this, as I'll probably use it again someday. One of these eons I want another Epi Dot (or similar)....
Thanks.
Sent from my iPhone using Tapatalk
-
Brian,
If you can get a 3/8" dowel to use as a gauge and a 1/4" dowel as an arbor for your sandpaper, you can make quick work of enlarging the holes safely without fear of over step-bitting or over reaming or any other over-doing it. Just sand a little, try the gauge, sand a little more, try the gauge again, until it fits. Doing any of this by hand you also have to be careful that you don't plunge whatever tool you're using too deeply. You don't want bash marks inside where you hit the back.
In my ape hands, step bits or countersinking bits are risky--you plunge a millimeter too deep and you won't be happy. That said, I'm sure any of the suggestions from our family here will work fine if you go slowly and carefully. Please post pics of the finished project! Good luck!
Roli
-
Nice, grommetization, icr! Originally Posted by icr
-
I successfully rewired my Epi Riviera by following this procedure I found in a YouTube video:
Carefully enlarging the holes with a standard drill (in the required diameter) running in reverse direction - counter-clockwise. This procedure prevents the drill from suddenly being “drawn” into the body once the hole is complete. The drill turning in reverse direction is very soft to the edges of the hole.
It was easy-peasy and yielded a perfect result. Just keep your hand steady and carefully control the downward force when drilling.
-
Now see I allways thought the word was “grommetification”. I was mistaken. Originally Posted by rolijen
-
Thought on it, don't think I'd try it with this drill bit I have...a new one, perhaps. Originally Posted by Duotone
I have done similar before. It does work.
Sent from my iPhone using Tapatalk
-
Just got back from running around, dowel and sandpaper it is.
Harness is done. Yay.
On to the woodworking.
Sent from my iPhone using Tapatalk
-
Wow. Beautiful work, Brian. Originally Posted by Brian B
-
Some of you guys have great ideas and for sure they are "correct methods". In a previous career I was a field engineer always trying to get stuff to run ASAP with what I had in hand or near by then doing a proper fix when I had the "right stuff". I still go that route when I tinker, usually (ha ha) with good results. When I read the title my 1st instinct was to grab a drill bit just a little larger than the hole then turn the bit BY Hand to enlarge the hole. Other methods mentioned are much more elegant for sure
-
I wound up going with the dowel and sandpaper method. The stack of sandpaper was still on my workbench from match sanding the bridge on my other archtop last week (two weeks ago? lol). Chucked a piece about an inch and a half in the cordless drill with 100 grit wrapped around it and was done in no time.
She's all back together now. Strung but not stretched. Woohoo.
Sent from my iPhone using Tapatalk


 Reply With Quote


Interesting Acoustic-Electric 7-String
Yesterday, 06:32 PM in Guitar, Amps & Gizmos