
In this lesson you will learn how to play guitar arpeggios. You will learn how to use arpeggios to improvise over chord changes and jazz standards, as well as the music theory involved. Arpeggios are an essential building block of the jazz player’s vocabulary and give your solos that instant “jazzy” flavor. Understanding, practicing and mastering arpeggios is essential for all jazz guitarists. Learning arpeggios will improve your guitar solos instantly by making them more interesting to listen to.
An Overview of What You Will You Learn
- What Are Arpeggios?
- What Are Arpeggios Used For?
- Basic Arpeggios Shapes
- Arpeggios Over a 2 5 1 Chord Progression
- Arpeggio Charts
- Arpeggios of the C Major Scale
- Blue Bossa Arpeggio Study
- Practicing Arpeggios
- Diminished Arpeggios over Dominant Chords
- Arpeggios Over Minor ii V I Chord Progressions
- Arpeggios & Approach Notes
- Arpeggios & Enclosures
- Autumn Leaves Arpeggio Study
What Are Guitar Arpeggios and How Do They Work?
Here is the definition of the word arpeggio:
An arpeggio is a broken chord, where the notes of the chord are played in succession instead of simultaneously.
Arpeggios are used in all genres of music, such as jazz, blues, rock, metal, classical music, pop, etc. In jazz (and metal) arpeggios are used differently compared to other genres of music.
In pop music for example, an arpeggio on guitar is usually used for accompaniment. Instead of playing or strumming the notes of a chord simultaneously, the individual notes of the chord are played in succession by applying a fingerpicking pattern, usually on acoustic guitar.
Here’s an example of how an Am arpeggio can be used in pop music. The base of this arpeggio is a basic Am chord shape and the notes of the chord are not muted after they are played, but ring together.
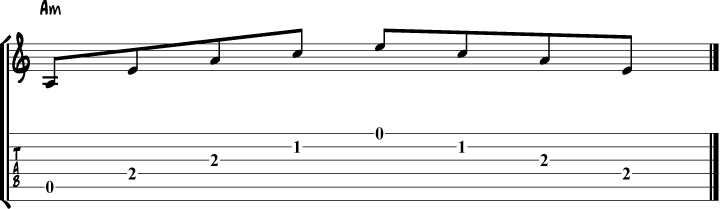
In jazz (and blues, metal, etc), arpeggios are used as an improvisation technique for soloing instead of accompaniment. In contrast to arpeggios used in other genres of music, the notes of a jazz guitar arpeggio are usually played with a plectrum (unless you play fingerstyle) and muted after they are played, so they don’t ring together. Another contrast is that these arpeggios are not based on a chord shape.
Here’s an example of how an Am arpeggio would be played in jazz:
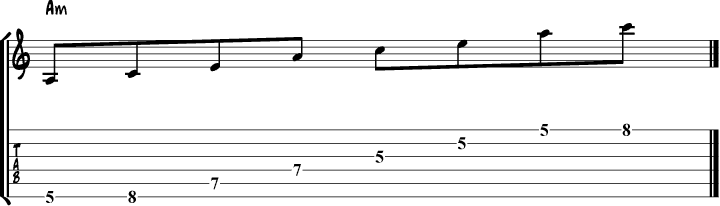
In this tutorial we will be focusing on the jazz-type of arpeggios.
What Are Arpeggios Used For?
Why learn guitar and practice guitar arpeggios? Because arpeggios are a great tool to improvise over chord progressions and jazz standards:
- Chord tone soloing: playing arpeggios in your guitar solo will outline the harmony of the tune (contrary to scales). This chord outlining gives your improvisation a sense of direction, making it more interesting to listen to.
- Arpeggios make it easier to improvise a nice voice leading, making your solos more melodic.
- You can use arpeggios to add color and complexity to your solos by using substitutions.
How To Start Using Arpeggios
Now, which arpeggios should you learn?
Every jazz guitarists needs to know how to play the arpeggios of all chord types in all positions of the guitar neck.
This may not seem a simple task, but with a good practice routine, you will be able to play all arpeggios without thinking in a relative short period of time.
So, before learning how to use arpeggios in guitar solos, let’s get started by learning the basic positions.
Basic Arpeggio Shapes: Minor, Dominant and Major
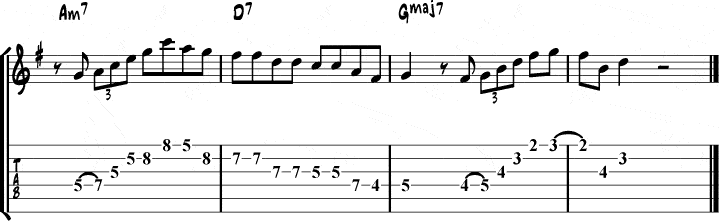
We’re going to learn the basic arpeggio shapes (aka grips) by looking at the most common chord progression in jazz, the 2 5 1 (II V I).
In this example we’ll be working with a 2 5 1 progression in the key of G major:
| Am7 | D7 | Gmaj7 | % |
| ii | V | I |
To play over this kind of chord progression, you need 3 types of arpeggios: minor, dominant and major.
The Minor Arpeggio
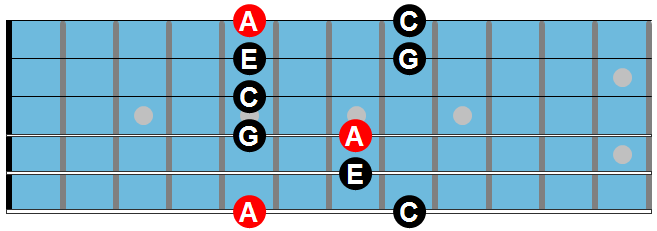
Here are the arpeggio notes of the Am7 chord:
| Am7 Arpeggio | A | C | E | G |
|---|---|---|---|---|
| 1 | b3 | 5 | b7 |
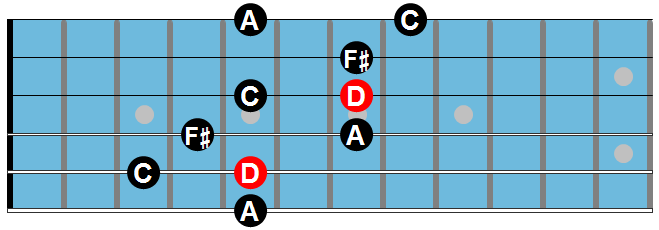
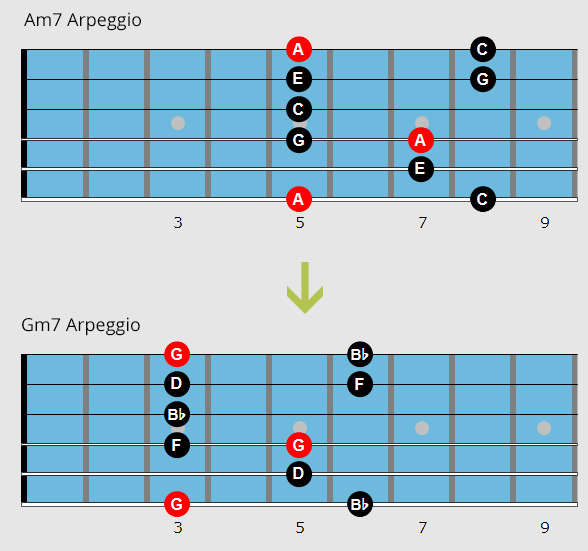
And here is the guitar arpeggio shape for the Am7 chord:
![]() red dots represent the root or 1 of the guitar chord.
red dots represent the root or 1 of the guitar chord.
![]() black dots represent the other chord notes. The letters are the note names.
black dots represent the other chord notes. The letters are the note names.
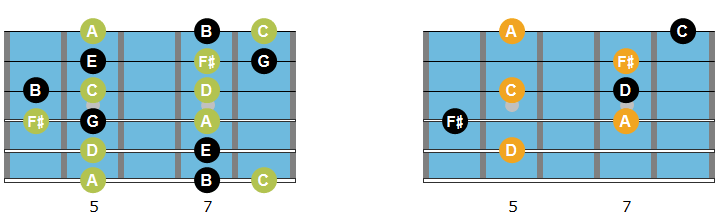
Here is the same arpeggio in relation to its scale (A Dorian) and chord (Am7):
Am7 arpeggio vs A Dorian scale Am7 arpeggio vs Am7 chord
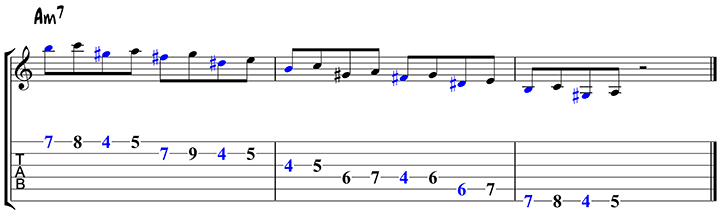
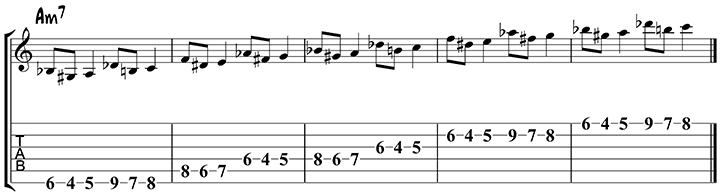
Am7 Arpeggio Exercise #1: practice the A minor arpeggio as notated on the tabs below (until it flows naturally):
Am7 Arpeggio Exercise #2: you can also practice by playing the chord before the arpeggio, a good exercise for your ears.
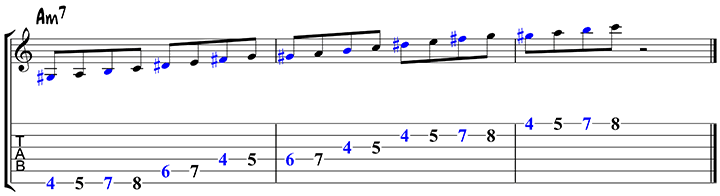
Arpeggio Patterns
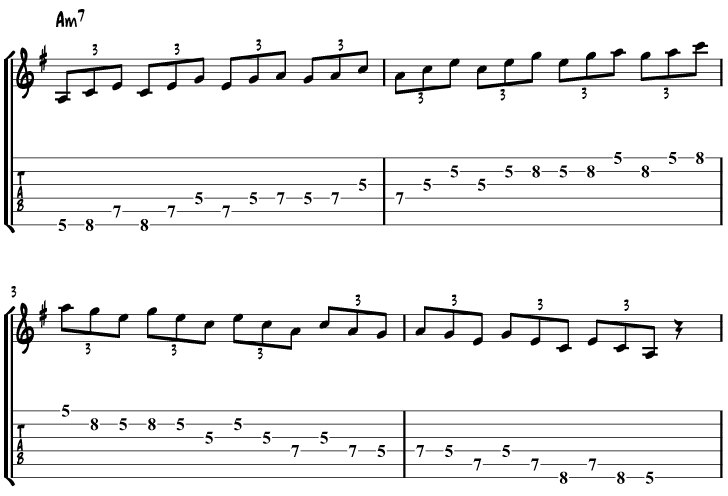
Here are 2 arpeggio patterns that are a little more technically advanced, practicing these is optional, but a good exercise to get the arpeggio shapes under your fingers. I’ve written out these patterns for Am7 only, but you can use the same pattern on all arpeggios, including the dominant and major arpeggios that follow.
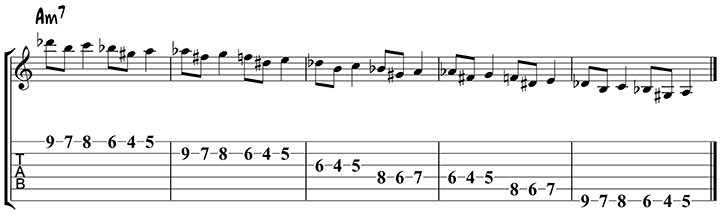
Am7 Arpeggio Pattern #1: This first pattern plays the arpeggio in 5th and 4th intervals, achieved by skipping notes:
Am7 Arpeggio Pattern #2: this pattern divides the arpeggio in groups of 3 notes:
The Dominant Arpeggio
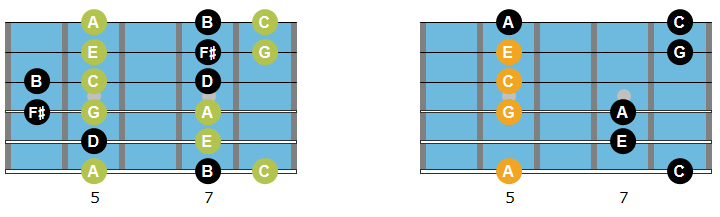
We go on to the notes and formula of the D7 chord:
| D7 Arpeggio | D | F# | A | C |
|---|---|---|---|---|
| 1 | 3 | 5 | b7 |
Here is the same arpeggio in relation to its scale (D Mixolydian) and chord (D7):
D7 arpeggio vs D Mixolydian scale D7 arpeggio vs D7 chord
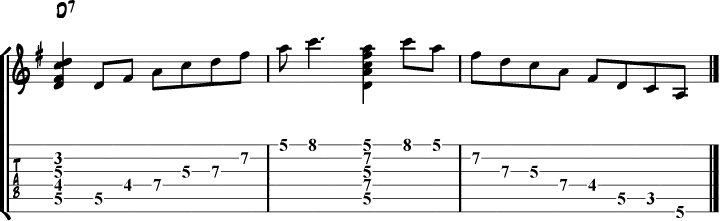
D7 Arpeggio Exercise #1: Get this dominant arpeggio in your fingers by practicing like you did for the Am7 chord:
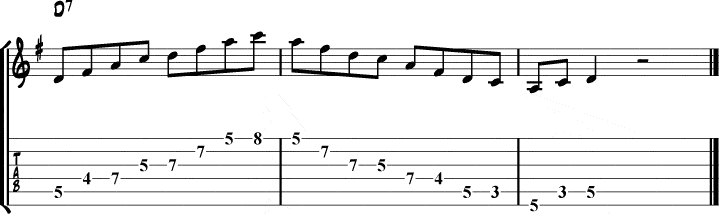
D7 Arpeggio Exercise #2: Similar to the minor arpeggio examples, you can also play the chord before the arpeggio:
The Major Arpeggio
And then we arrive at the last chord of the chord progression, the Gmaj7 chord:
| Gmaj7 Arpeggio | G | B | D | F# |
|---|---|---|---|---|
| 1 | 3 | 5 | 7 |
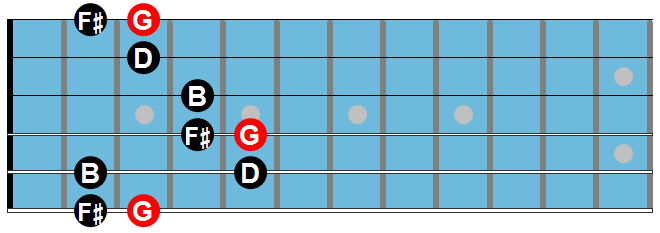
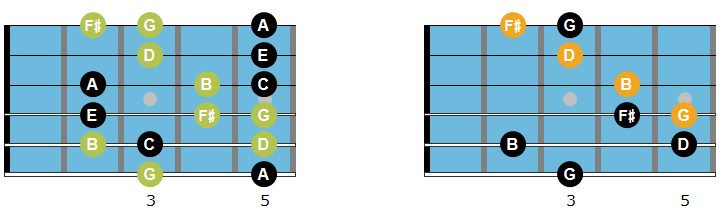
Here is the same arpeggio in relation to its scale (G Major aka G Ionian Scale) and chord (Gmaj7):
Gmaj7 arpeggio vs G major scale Gmaj7 arpeggio vs Gmaj7 chord
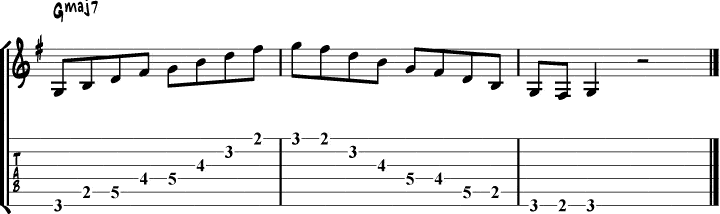
Gmaj7 Arpeggio Exercise #1: Practice this major arpeggio the way we did for the minor and dominant arpeggio:
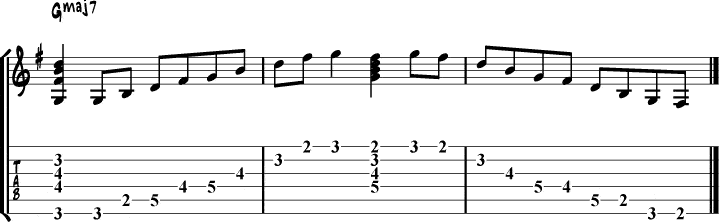
Gmaj7 Arpeggio Exercise #2: And with the Gmaj7 chord in front of the arpeggio:
Movable Shapes
One thing you need to know: all arpeggio shapes are movable. If you know the arpeggio for Am7 you can use that same ‘shape’ to find the arpeggios for other minor chords.
For example: let’s say you want to find the arpeggio for Gm7. All we have to do is slide the Am7 arpeggio shape 2 frets down. Instead of starting on the 5th fret (in case of Am7), we start on the 3rd fret for Gm7. You move the root of the arpeggio and play the shape from there, like this:
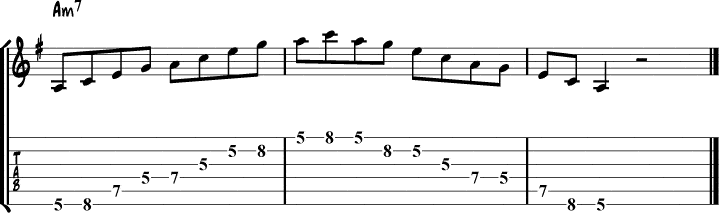
Arpeggios Over a ii V I Chord Progression
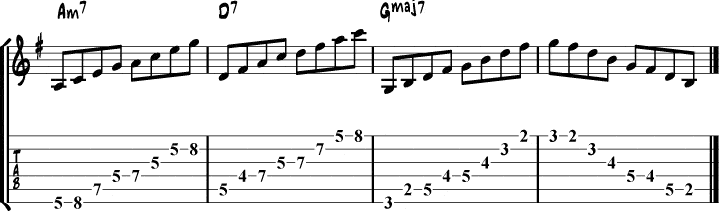
We know the basic positions for the arpeggios, now we’re going to combine them so the arpeggios follow the 251 chord progression.
Exercise #1 – Ascending
The first thing we’ll practice is playing the arpeggios ascending, starting from the root. This exercise is not very musical and you will never use them like this for improvisation, but it’s a necessary step in learning how to play arpeggios.
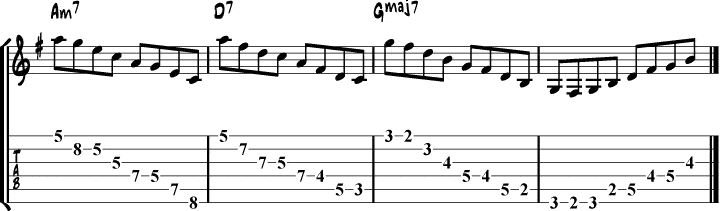
Exercise #2 – Descending
Next, we’ll play the arpeggios descending:
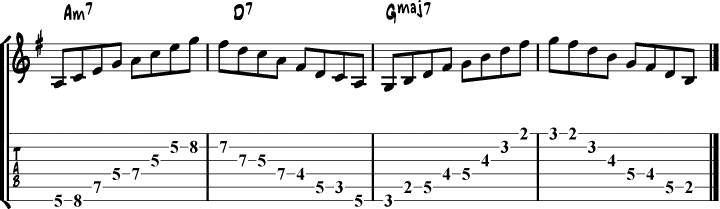
Exercise #3 – Alternating
The next step is alternating the arpeggios. We do this by playing the first arpeggio (Am7) for 1 bar and then switch to the nearest note of the second arpeggio (D7) in the second bar. The same happens when we switch to the third arpeggio (Gmaj7).
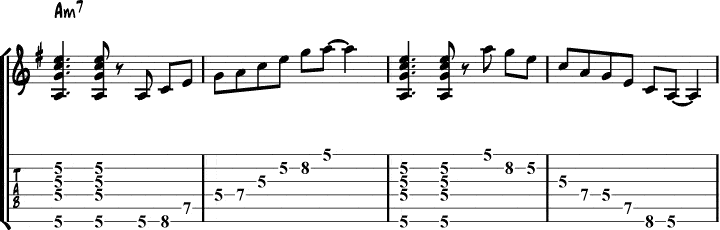
Exercise #4 – Alternating Variation
Let’s have a look at another alternating example, starting from a different location of the guitar neck. Instead of starting the Am7 arpeggio on the low E-string, we will start it on the high E-string:

When you’ve got these basic arpeggio shapes under your fingers, the following (important) step is to start improvising using these shapes. Practicing arpeggios starting from the root in streams of 1/8 notes is an important step in the learning process, but not very musical. Once you got this step under your fingers, it’s important to get creative so you don’t end up sounding like a robot on stage…
Arpeggios can be started on any note and played in any order. You can mix notes, skip notes and use any rhythm you can think of. Be creative!
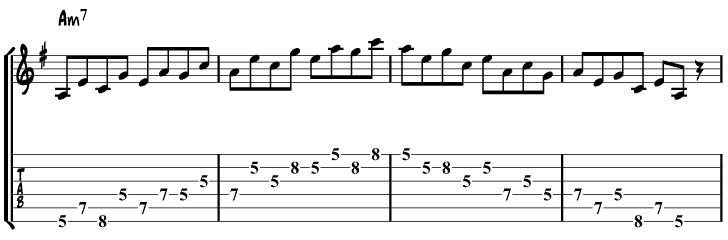
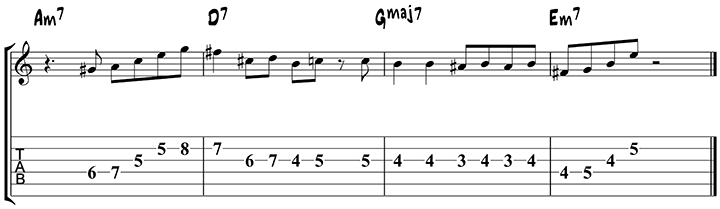
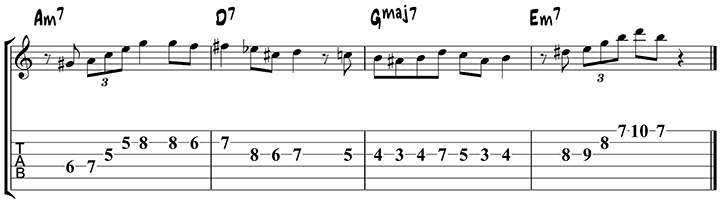
Arpeggio Lick #1
Here’s a more musical example, using the same arpeggio shapes over the same 251 chord progression, but with a variety in rhythm and note order:
Now start to improvise yourself, using only the basic shapes you learned so far. Use the backing track to make sure you make the arpeggio change at the right time.
Arpeggio Charts
So far in this tutorial, we worked with arpeggio shapes that have their root on the E-string (Am7 and Gmaj7) or on the A-string (D7). There are of course a lot of other positions these arpeggios can be played.
The following charts in the list below are an overview of arpeggio positions for the most common chord types. The big diagram shows all the notes of the arpeggio over the entire neck, the smaller diagrams beneath it show the individual arpeggio grips.
All 22 grips below need to be memorized and practiced so you can play them fluently and without hesitation…
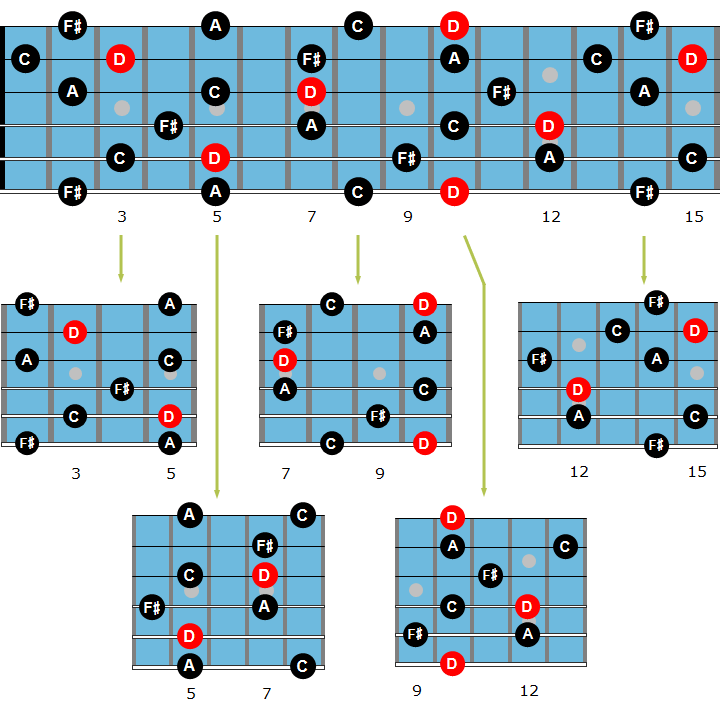
Major Arpeggio Chart (Gmaj7)
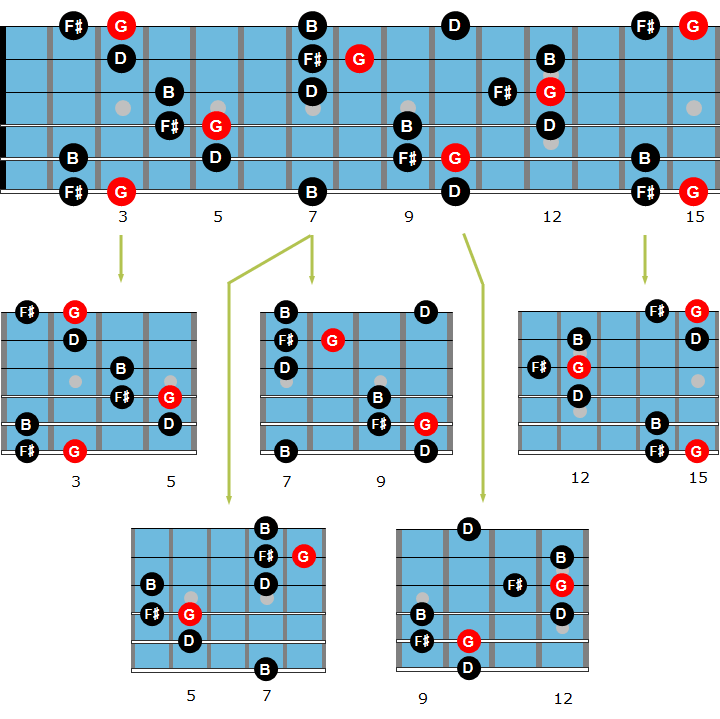
C A G E D
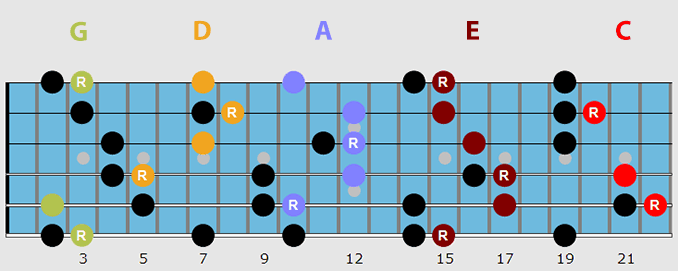
Those of you familiar with the CAGED system, will recognize that the 5 Gmaj7 arpeggio shapes above correspond with the 5 basic chord shapes (C A G E D):
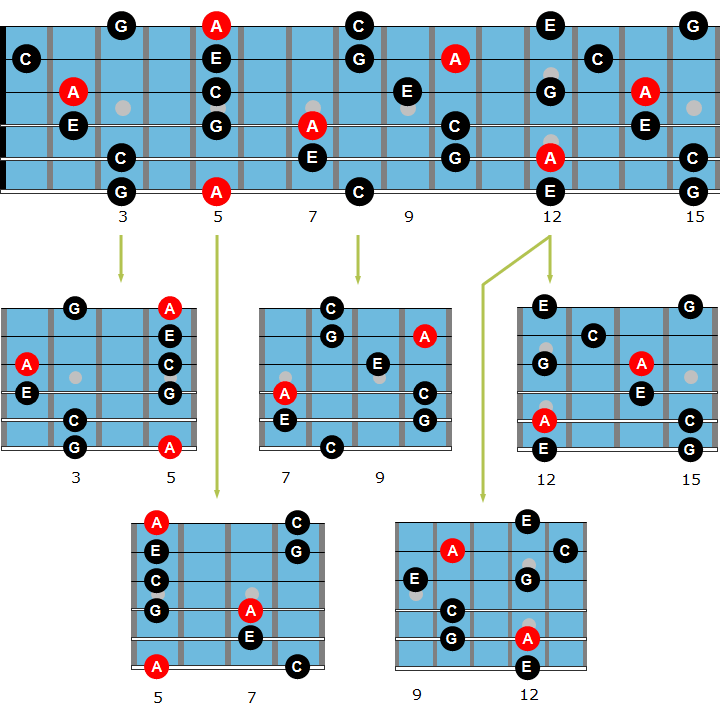
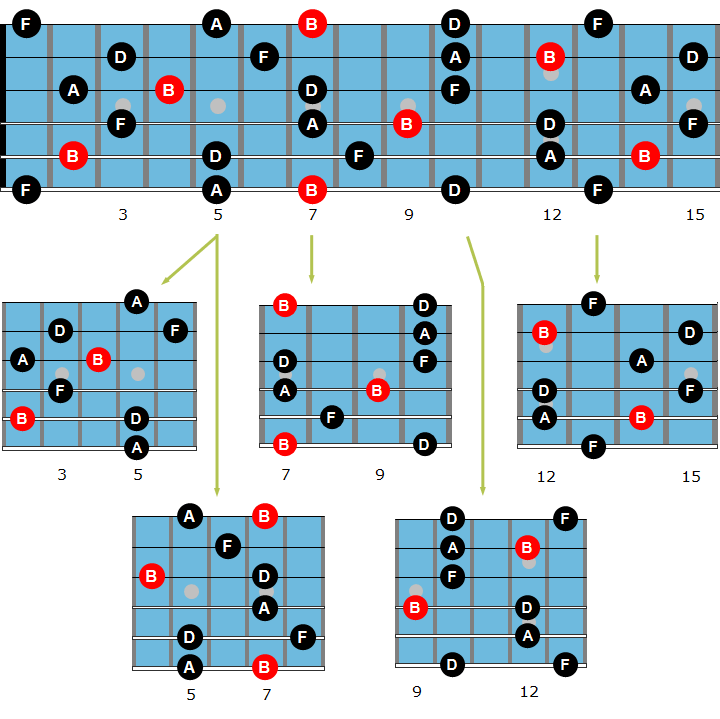
Minor Arpeggio Chart (Am7)
Dominant Arpeggio Chart (D7)
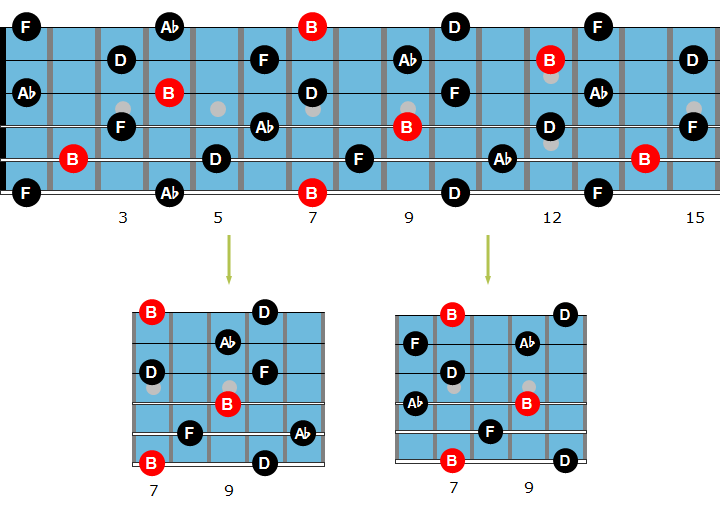
Half-Diminished Arpeggio Chart (Bm7b5)
Diminished Arpeggio Chart (B°7 = D°7 = F°7 = Ab°7)
Only 2 grips for diminished chords because diminished chords are symmetrical (learn more about diminished chords here).
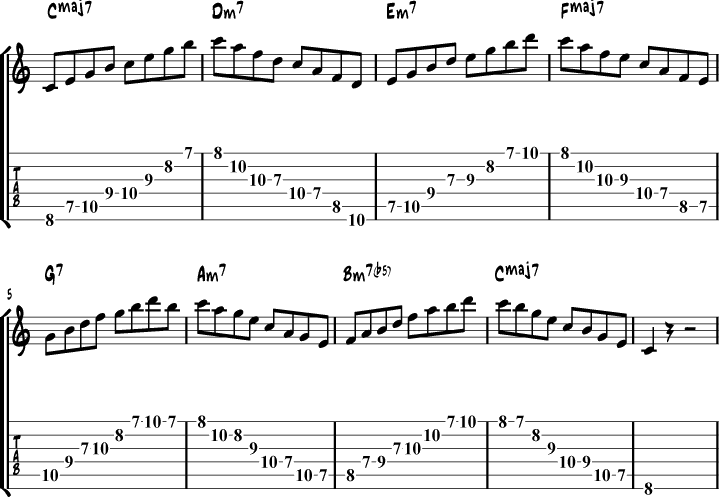
Arpeggios of the C Major Scale
A good exercise to practice the arpeggio shapes above is to play the arpeggios of the chords of the C major scale in 1 position.
Here are the diatonic chords in the key of C (if you’re not sure where these chords come from, have a look at our Chord Tutorial):
| Cmaj7 | Dm7 | Em7 | Fmaj7 | G7 | Am7 | Bm7b5 |
|---|---|---|---|---|---|---|
| I | II | III | IV | V | VI | VII |
C Major Scale Arpeggios Exercise #1
In this exercise we play every chord arpeggio for the length of 1 bar, while staying in the 7th position (more about guitar positions).
C Major Scale Arpeggios Exercise #2
This is the same exercise as above, but this time starting in 2nd position:
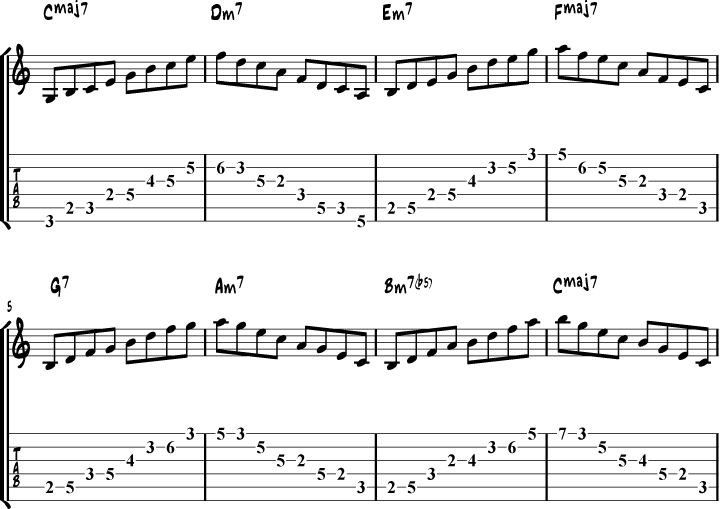
Practice this exercise in all positions of the guitar neck.
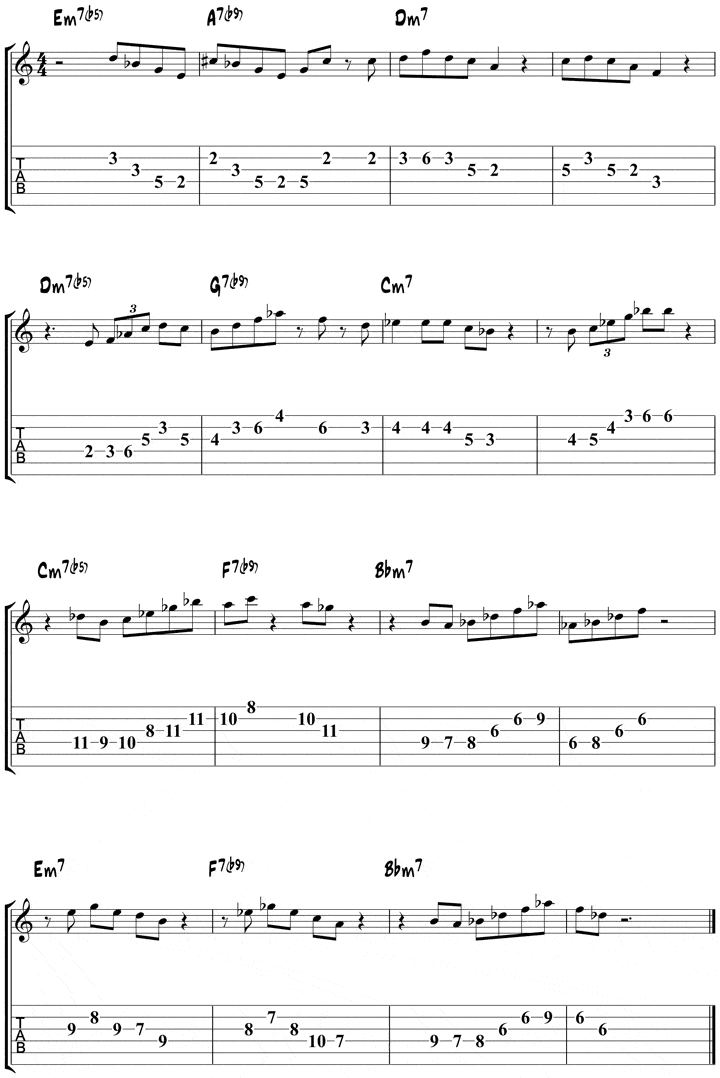
Blue Bossa Arpeggio Study
In this section you are going to learn how to use the arpeggio shapes you learned earlier over a jazz standard, Blue Bossa in this case.
When learning a tune, it’s important to be able to play the arpeggio of any chord you encounter, anywhere on the guitar neck.
Start by playing the arpeggios through the song using only quarter notes, and stick to using only a single arpeggio shape per chord.
After playing through Blue Bossa using quarter notes, try playing through the lick below.
The lick uses the same notes as the arpeggios from the previous example, but changes the order of the notes and varies the rhythm.
For additional practice and soloing ideas, play only eighth notes through the chord changes:
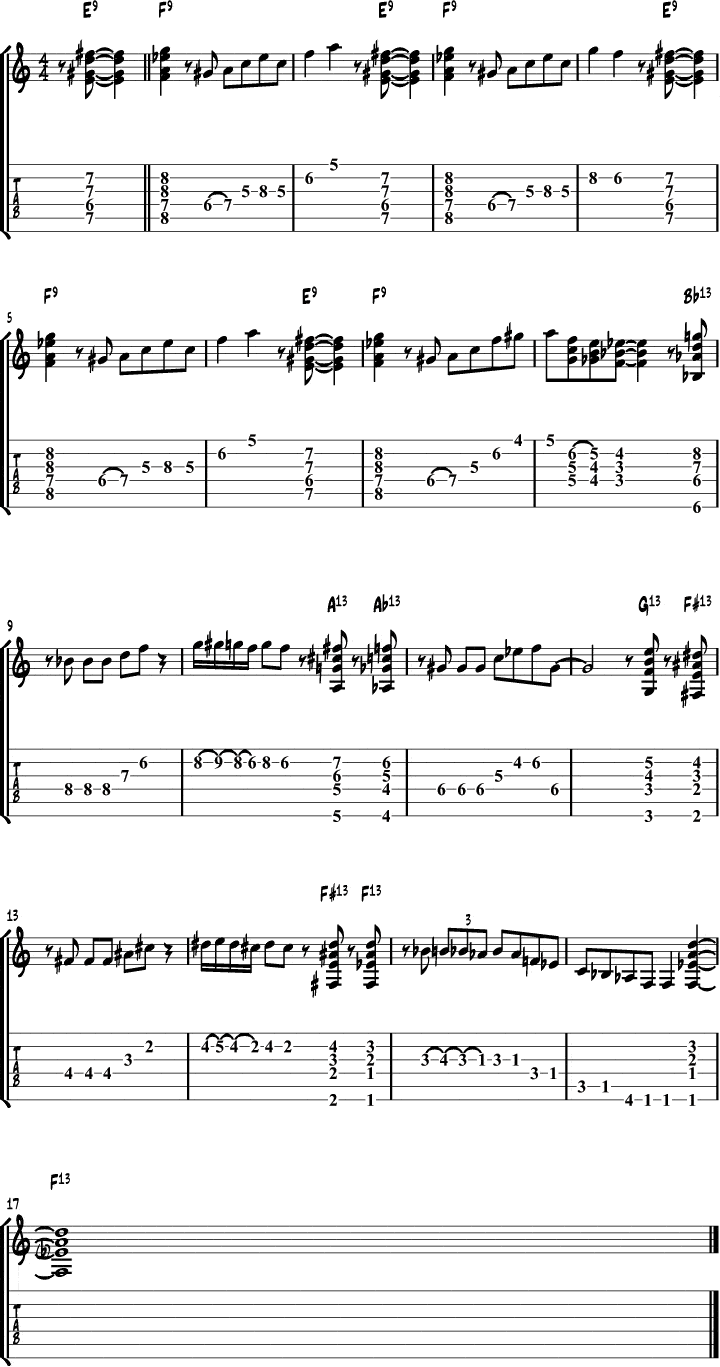
Practicing Arpeggios
When practicing new scales, arpeggios, or chords, it’s a good idea to practice in a musical context. Often when I try to incorporate a new concept or fingering into my playing, I make a little tune out of the new material.
Here’s an example of such a tune. This exercise will teach you how to play 9 and 13 arpeggios, as well as their respective chords.
F9 Arpeggio
The first chord and arpeggio is an F9, which is an F7 + the tension 9:
| F | A | C | Eb | G |
| 1 | 3 | 5 | b7 | 9 |
Here’s the chord (1st diagram) and arpeggio diagram (2nd diagram). In the exercise I use variations of the arpeggio to make it more interesting:
Bb13 Arpeggio
The second type of chord and arpeggio is the Bb13 (bar 9), which is an Bb7 + the tension 13:
| Bb | D | F | Ab | G |
| 1 | 3 | 5 | b7 | 13 |
Here’s the chord (1st diagram) and arpeggio diagram (2nd diagram). In the exercise I use variations of the arpeggio to make it more interesting:
The scale I use to end the tune is the F minor blues scale (bar 15).
Arpeggio Practice Tune
Backing Track
Listen & Play Along
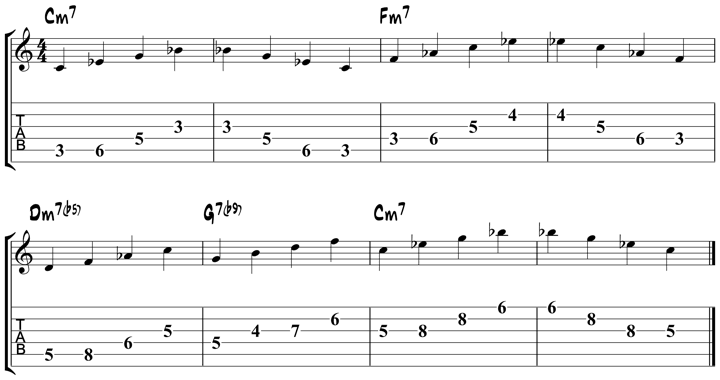
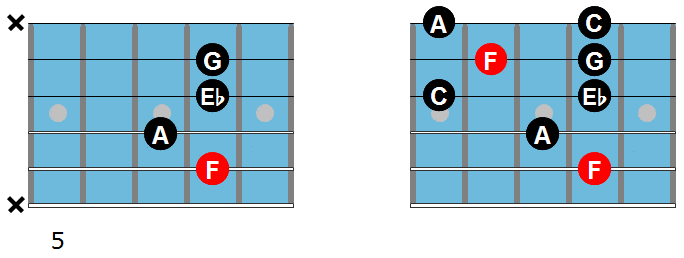
How to Use Diminished Arpeggios over Dominant Chords
Diminished arpeggios are often used to play over dominant (7b9) chords. Here is the rule of thumb:
You can play a dim7 arpeggio from the b9, 3, 5 or b7 of any dominant 7th chord. This will result in a 7b9 sound.
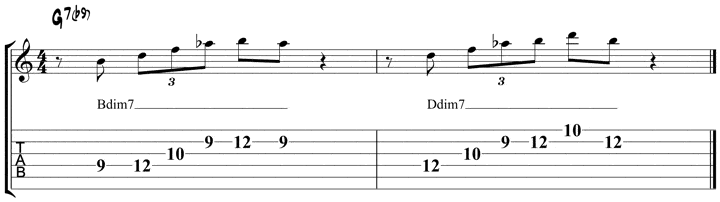
For example: over a G7, you can play an Abdim7, Bdim7, Ddim7 or Fdim7 arpeggio:
| Abdim7 Arpeggio | Ab | Cb | Ebb | Gbb |
|---|---|---|---|---|
| Played over G7 | b9 | 3 | 5 | b7 |
| Bdim7 Arpeggio | B | D | F | Ab |
| Played over G7 | 3 | 5 | b7 | b9 |
| Ddim7 Arpeggio | D | F | Ab | Cb |
| Played over G7 | 5 | b7 | b9 | 3 |
| Fdim7 Arpeggio | F | Ab | Cb | Ebb |
| Played over G7 | b7 | b9 | 3 | 5 |
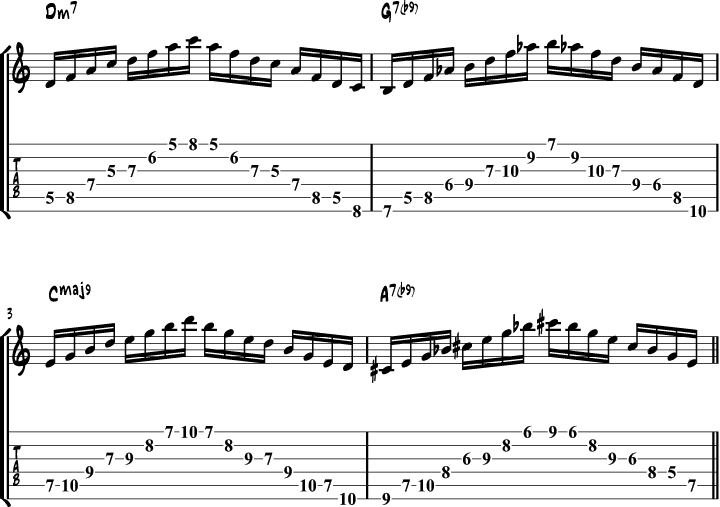
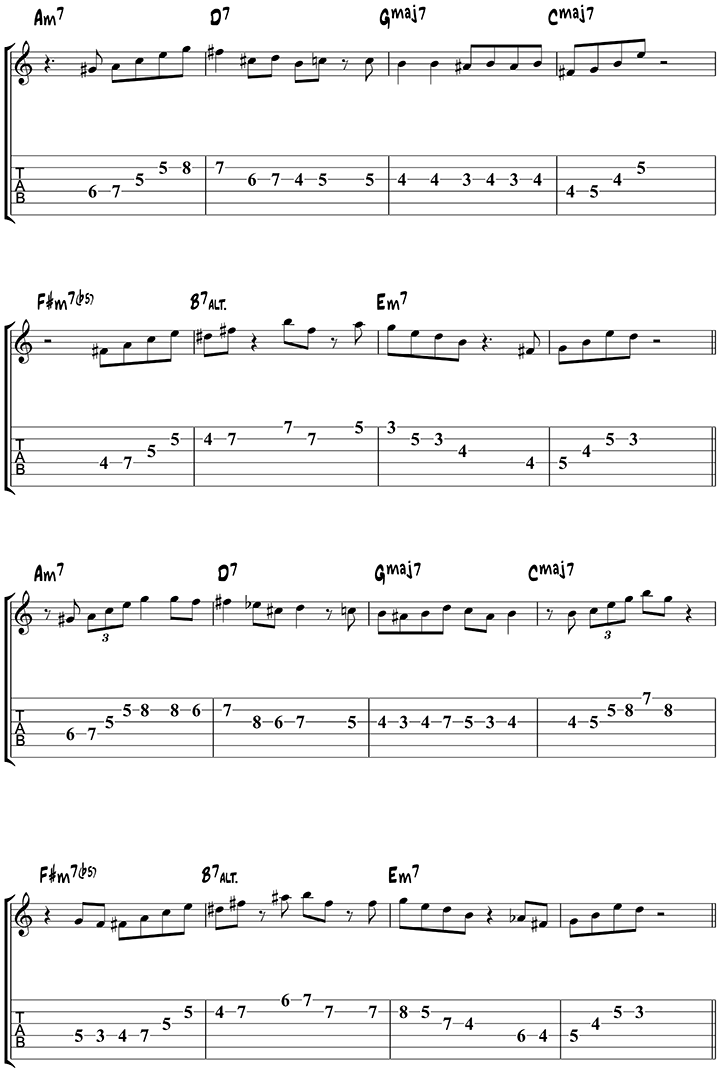
In this arpeggio technique exercise, you’ll learn how to play diminished arpeggios over dominant chords. The exercise is played over a ii V I VI7 chord progression in C major.
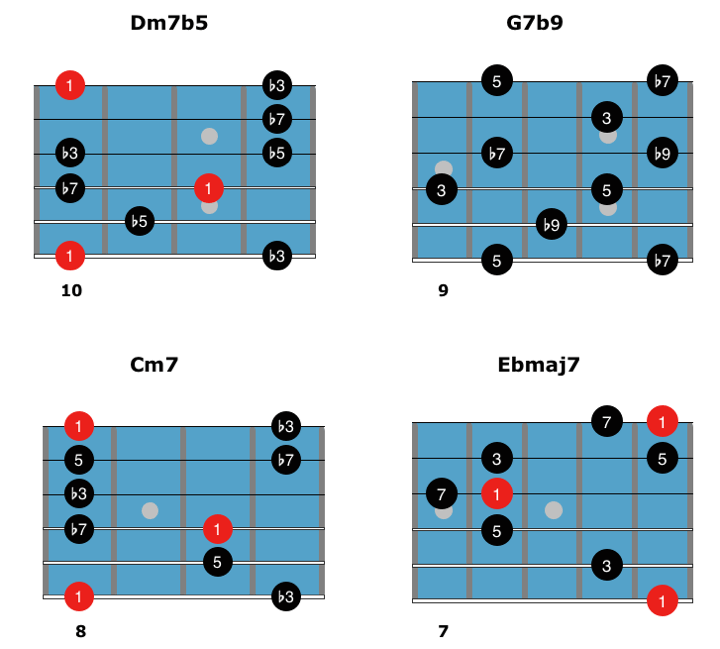
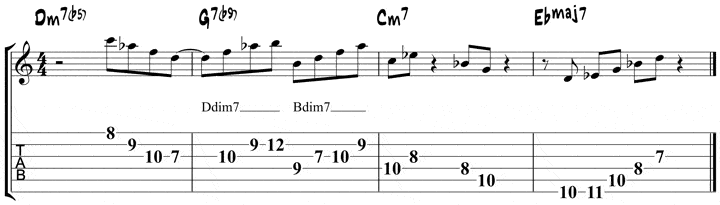
Dm7 (ii): over the first chord a normal Dm7 arpeggio is played:
G7b9 (V): here a diminished arpeggio (Bdim7) starting from the 3rd (b) of the dominant chord is played. There is a slight difference between the arpeggio shape played ascending and the shape played descending to make it easier to go to the next arpeggio shape.
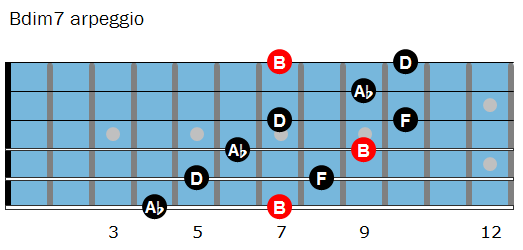
Notice that the Bdim7 outlines the 3, 5, b7 and b9 notes of the G7b9 chord. It is a rootless arpeggio (there is no 1), which we often refer to as the 3-b9 arpeggio.
Diminished chords (and arpeggios) are symmetrical because they are built by stacking minor thirds. This means that you can treat any note of a dim7 arpeggio as the root note: you could think of the Bdim7 arpeggio as either Bdim7, Ddim7, Fdim7 or Abdim7, they are all the same.
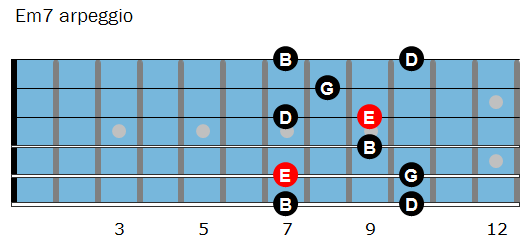
Cmaj9 (I): here I play an Em7 chord over Cmaj7. Em7 is the first superimposed chord of Cmaj7 and the arpeggio shape is the same as the Dm7 you used before, but 2 frets higher.
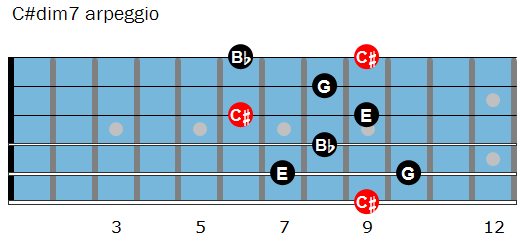
A7b9 (VI7): here a diminished arpeggio (C#dim7) starting from the 3rd (c#) of the A7 chord is played. There is again a slight variation in the second shape to facilitate going to the next arpeggio.
The music notation and backing track:
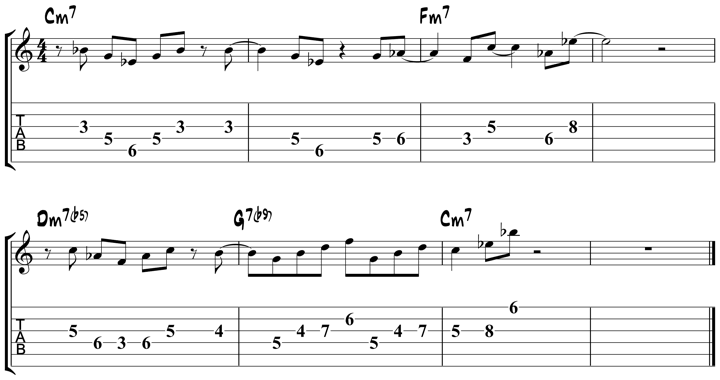
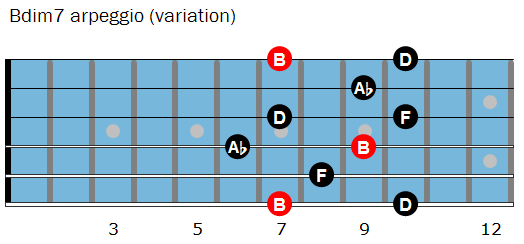
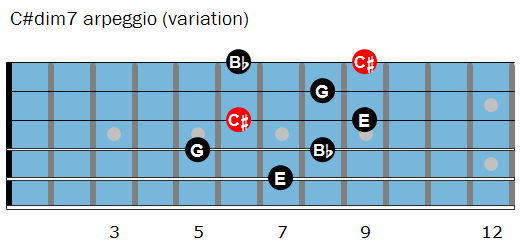
Here is another example. Notice that all the notes are from the Bdim7 arpeggio (the 3-b9 arpeggio over G7b9), but I’ve labeled the Ddim7 and Bdim7 arpeggio shapes so you can see how you can use any root note from Bdim7 to build other dim7 shapes on the fretboard.
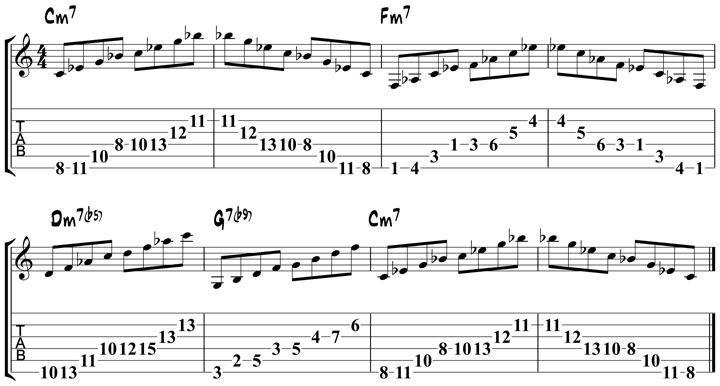
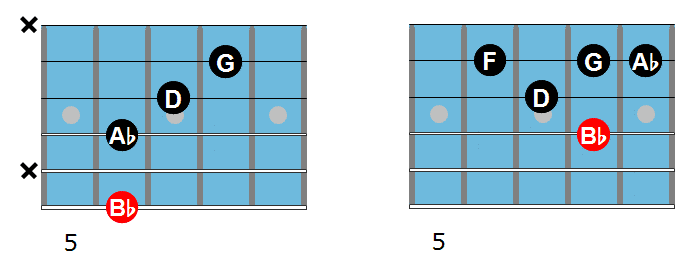
Using Arpeggios Over Minor ii V I Progresssions
Now that you know how to relate a dim7 arpeggio to the V7b9 chord, let’s have a look at two fingerings for these arpeggios and how you can apply them to improvise over minor ii V Is.
A very cool fingering is the shared root fingering: because any note in a dim7 arpeggio can be considered the root, if you take a Bdim7 and start from the second note in that arpeggio (D), you are now sharing a root note with the iim7b5 chord.
This means that you can now play iim7b5-iidim7 over the iim7b5-V7b9 section of the progression, allowing you to solo over those changes without changing the root note or moving your hand on the fretboard between chords.
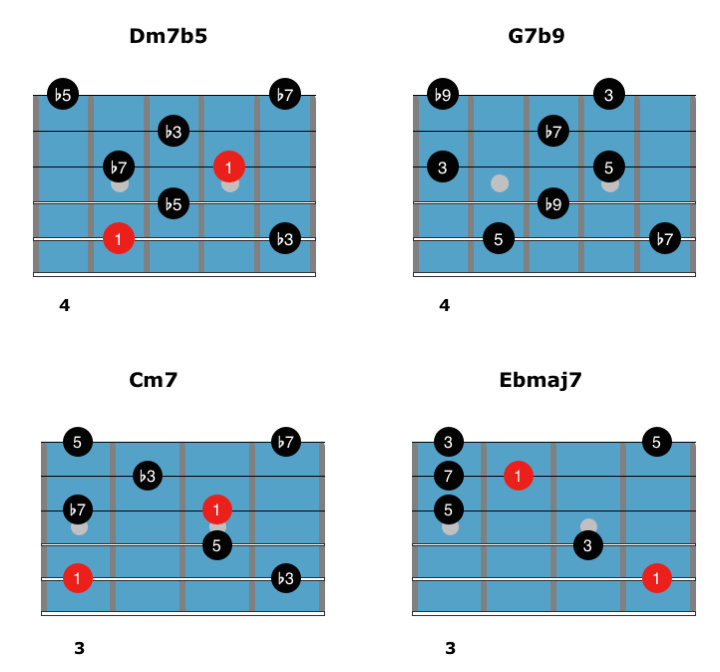
Here are the four arpeggios for a minor turnaround in C with the Dm7b5 arpeggio starting on the 6th string.
Here is a sample lick that uses all four of these shapes in its construction:
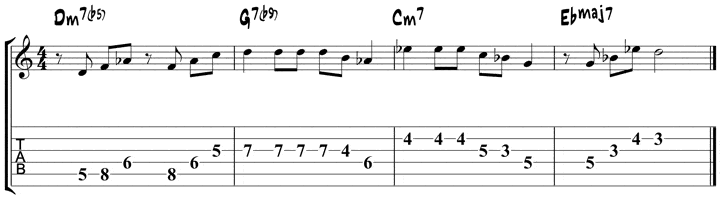
Moving on, here are all four arpeggios in the minor key turnaround in C from the 5th string:
Here is a sample lick to hear these shapes in action:
To help you take these minor ii V I arpeggios to a musical situation, here is a sample solo written out over the chord changes to a tune I’ll call Tune Down, which is a minor key version of the Miles Davis track, Tune Up.
Spicing It Up – Approach Notes
Arpeggios relate directly to the chord you’re soloing over, but they can sound a bit plain, as they offer nothing new to that chord. To help you avoid this in your solos, you’ll have a look at some common chromatic techniques over arpeggios.
The first arpeggio concept is called approach notes, where you approach any note in an arpeggio by one fret below. When doing so, you create a tension and release sound in your lines.
The only rule is that you can’t resolve to the chromatic notes. So, if you play an approach note, you then have to play a chord tone afterward.
Here’s an example of this technique in action, as you approach each note in an Am7 arpeggio from a fret below. The approach notes are in blue so you can easily see them on the fretboard. After you’ve worked this exercise over Am7, take it to other keys and arpeggio types in your solos:
Here’s the reverse of the previous exercise as you now descend an Am7 arpeggio with approach notes.
Here’s a lick that uses arpeggios and approach notes as you bring this concept to a musical situation. Learn this lick in the given key, then take it to other keys if you can. From there, write out a few licks of your own over this progression.
Spicing It Up: Enclosures
The next bebop technique uses two chromatic notes for each arpeggio note, as you encircle chord tones in your lines.
When playing enclosures, you play one fret above, then one fret below, then the chord tone.
There are a number of enclosures that you can use in your solos, but this is the best one to start with as it’s the most commonly used.
Here’s an example of an enclosure as applied at an Am7 arpeggio, ascending a two-octave version of that arpeggio. Work this exercise with a metronome in as many keys as you can, and then take it to other arpeggio shapes.
The next exercise reverses the previous one, as you now descend an Am7 arpeggio with enclosures.
Here’s a lick that uses arpeggio enclosures over a ii V I vi progression in G major. After you learn this lick, write out 2-3 of your own that use arpeggios and enclosures in its construction.
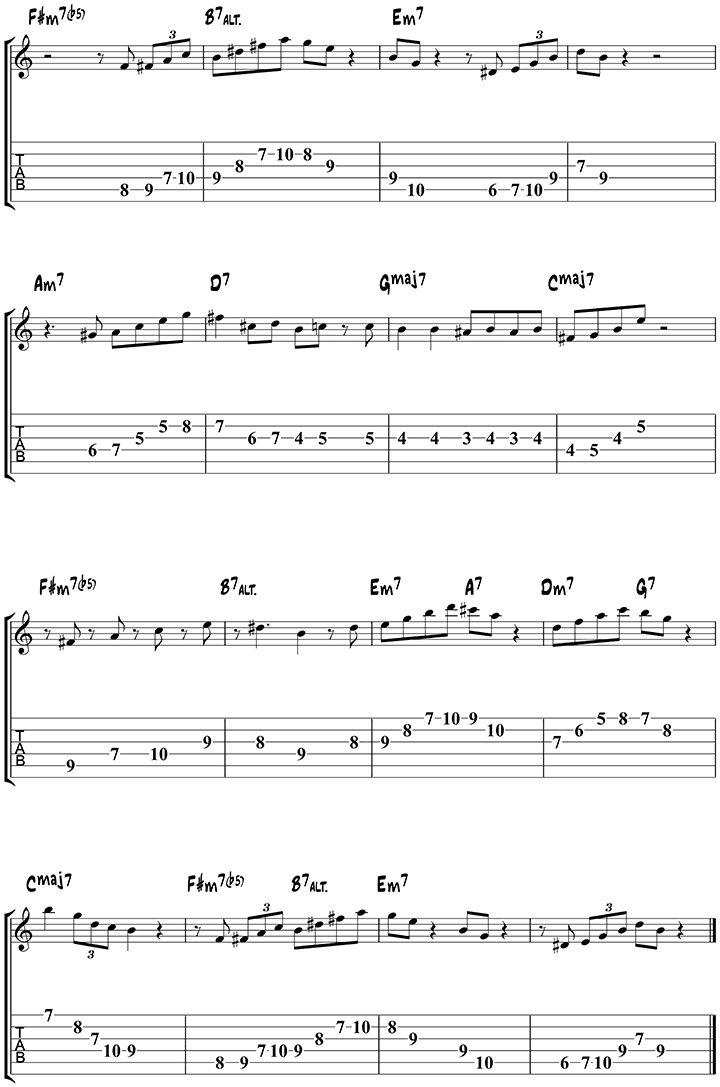
Autumn Leaves Arpeggio Study
To complete our arpeggio tutorial, we will learn how to use arpeggios in a song. To get you started applying arpeggios over chord changes, here is a solo over Autumn Leaves that uses arpeggios and concepts from this section.
Work the solo one phrase at a time until you can put everything together to form the solo as a whole. From there, you can play it along with the audio example, as well as solo over the backing track as you create your own arpeggio solos over this tune.
This lesson is available as a printable PDF (a part of our Beginner’s Guide to Jazz Guitar) for our newsletter subscribers. If you are not subscribed to our free newsletter, fill out the form below and download your PDF:
For the 2 5 1 progression at the beginning it says “Use the backing track to make sure you make the arpeggio change at the right time.”, but I don’t see that Am7 D7 Gmaj7 backing track.
Hi in the arpeggio charts I was confused for a while why the lesson was working in Gmaj and then provided us the B-7b5 chart for half diminished. Now I see that it switched to C from there down. Should it be F#-7b5 arpeggio for Gmaj7?
What are the solfège syllables for the 2-5-1 progression? If G is the one, then I know sleeve for G major scale. For the 2, would I sing the A as do in the A Dorian scale? Or is G still the do?
Thank you!
Hello!
I am trying to play Lick #1 (ii V I) with finger style but it sounds noisy when I play triplets. Can you give me some advice please?
Simply the best. Thank you so so much. God Bless.
Best lesson on this subject, and by far the best website for Jazz guitar.
Really grateful for sharing all this knowledge.
Great job , very professional.
I wish you and your partners all the best !!!
You sir STAND AMONG GREAT teachers!!
your website is “AWESOME” I have played 30-ish years, i play well but i only play at my church, i practice at least an hour a day usually 2 or 3 hrs. but approx. a month ago i wrote all the scales i could find down and started practicing them everyday to assure accuracy because i was getting a little bored because Christian music doesn’t have the musical challenge it once had you hit the same 3 notes fast with an 1/8 delay and that’s it and i needed to add some melodic “SEASONING” to my musical plate so my music would taste better then i found this website and “I LOVE IT” i been adding arpeggios to my arsenal but your website is “AWESOME” I wish i could tell the world, i’m so excited i have to go pee, THANK YOU, THANK YOU, THANK YOU
bon
Great lesson working out the arpeggios, especially knowing how to incorporate “some” approach notes and the occasional enclosure. I have tendencies to follow certain patterns, for example going from F# on 7th fret to D# on the 8th fret, never paying much attention to the fact that there is a D# on the 4th fret 2nd string especially when the bar before ended on an E on the 5th fret string 2. Seeing how someone else moves around the fretboard makes one discover new approaches. Thanks.
For the minor 7 arpeggios I have a bit of confusion with scale relation. Would that be based off the melodic or harmonic minor modes? Just need to wrap my head around scale relation. Thanks for the help:)
What a wonderful lesson for me , I really love this , thanks sir
Quite literally the best lessons I’ve ever encountered that show me how to “Jazz up” my blues playing. This information is absolutely priceless yet you’ve provided it free of charge. You are truly a Godsend. Thank you. From the bottom of my heart…
Thank you thank you thank you
Amazing lesson, thanks so much!
excelente , material de calidad! Muchas gracias!
This is great, and is really helping me to actually put the stuff I learn into my everyday playing. Thank you!
I really like this ! What an interesting way to learn arpeggios and throwing a little different Phrasing and Patterns.
Dear Matt & Dirk, I suggest You to insert this tutorial as introduction in Jazz Arpeggios Guitar. For beginner like me the manual would be easier and clearer.
Combining The 3 Basic Arpeggio Shapes exercises, The ascending and descending are in juxtaposition.
Thanks Bill, fixed it…
your diagram of a mixolydian scale is actually showing a dorian scale. please clarify for me.
The caption is supposed to say D Mixolydian instead of A Mixolydian, fixed it as well…
thank you
That’s an extremely simple but clarifying lesson!
Thank you for the lesson
Remarkable lessons..Thank you so much.
This reminds me of something I saw Eric Johnson talking about but with chord substitution. If I remember correctly he said one could eliminate the 3rd and play a triad of 1, 5, b7 and play it over either a Dominant 7th or a Minor 7th chord and it would fit. If you look at the last arpeggio on the 12th fret and play the 1, 5, b7, and the 9th on the 1st sting you have a 4 note arpeggio or chord you can play over the Dm7 for a different sound or just play the triad as a chord/arpeggio.
The Dominant 7th/Diminished 7th connection is an excellent study in and of itself. By using the Circle of 5ths and 4ths, further clarification can be seen. Here is a diminished chord [ C Eb Gb A ] with 4 names…C dim, Eb dim, Gb dim, & A dim……..By flatting any one of the notes in C diminished you will automatically form a dominant 7th chord. By flatting each note one at a time, they turn into the chords B7, D7, F7, Ab7. Thus, you can play diminished arpeggios from the 3rds of these dominant 7ths and they will all work in the appropriate key being played. When you take the elements of the C dim chord and divide it as such: C Eb Gb; Eb Gb A; Gb A C; A C Eb; you will find that these are the three notes connected to the Ab7 chord, the B7 chord, the D7 chord and the F7 chord. Therefore, you may expand your thoughts as per what is actually usable and within which chords they are found and can be used. If you do the same for all of the diminished chords as seen on the circle as being found opposite one another….you will be able to access all of this essential and revealing data for your own usage. Once you can see , it becomes quite clear but you must understand the “process” of organizing the diminished chords properly on the Circle of 5ths.
Suddenly , a lot of things suddenly fell into place for me. This is great . Thanks so much
Thanks for the guitar lectures you’ve been sending to my mail, honestly, I’m getting better. Please i really need more. Thank you.
Marvelous, Thanks
Nice work! Thanks again!
Every lesson open my mind and introduce me in this fantastic world.Thanks so much.
It’s great to hear that, Vito. You’re absolutely welcome!
In a word: serious
PS: what do you mean by “CAGED”?
Friendly
Hi Francis, CAGED refers to an approach to learning chords, scales, and arpeggios on the guitar based around the open chords C, A, G, E, and D, which are then moved up the fretboard to create moveable shapes on the neck. hope that helps.
Thank you. I was stupidly searching around the word cage.
Hi Mike. From my perspective, I’ve never learned arpeggios in inversions. I prefer to use the method above, where you cover the fretboard with one-octave shapes, then combine them to make two-octave shapes. By doing that, you’ve got the fretboard covered for the most part, and you’re visualizing from the root, which can make things easier and quicker when soloing.
The other approach I like to use is diatonic arpeggios rather than inversions. So if soloing over Cmaj7, I would use Cmaj7, Dm7, Em7, Fmaj7, G7, Am7, and Bm7b5 arpeggios to bring out different colors over that chord. And again, focusing on root-based shapes, just diatonic ones this time, in my lines.
Inversions are cool if you can get used to seeing them on the fretboard, but also try these approaches as they can get you to the same results, and usually in an easier pathway.
Hmmm, so correct me if I’m wrong, but you seem to be thinking a diatonic substitute chords instead of inversions. So, playing Em7 or Am7 instead of CMaj7/E. Instead of E, G, B, C, you’re more likely to think E, G, B, D or A, C, E, G. Am I on track here?
In regards to this lesson, at what point works you say that one should work out the arpeggio shapes in inversion? Starting with the 3rd, the 5th, and the 7th off the chord? I was considering how to voiceless these arp shapes within the CAGED scale fingerings.
Once again, here is a very well thought-out lesson of yours. I can only thank you for sending me your lessons. THANKS SO MUCH Dirk and The Jazz Guitar Blog.
I just noticed that you play using the alternate picking technique. Really a good exercise indeed!!
How do you get that beautiful warm tone from your guitar? Smooth.
Thanks friend Dirk for sharing your lessons ! very useful !
Dirk,
Thank you for the latest offering, an incredibly useful useful set of Diminished/Minor Arps
for a warm up and practice regime. btw love the tone of the guitar, as good as a Gibson.
But as Larry Carlton says ” it’s all in the fingers.
Alan
Hi Dirk
i really like the way you treat this arpeggio and its sounds like you are playing highlife from Ghana
Inspirational; sets the mind to explore; thanks Dirk!
Nice lesson!! I like how you show four different ways to play the diminished arpeggio. I also like how you put the Em7 arpeggio over the Cmaj9 chord. Great sound! Thanks!
Nice lesson Dirk , thanks!
The diminished arpeggio example is an EXTREMELY EXCELLENT exercise. It helps to get the fingers to flow smoothly with out the mind getting involved / in the way. It is now part of my warm-up exercise.
JL
When I play arpeggios they just sound like, well… arpeggios. Nothing like the bebop sounds I hear on these clips!
I’m just picking it up n I find it so interesting to learn
Thanks
Great work my friend.Very useful
Dirk, thank you SO MUCH for this lesson. It’s exactly what I need!!!
If you have a collection of these arpeggio studies I’d be happy to buy them from you!
To give so much, and ask for nothing in return is an outstanding character trait! We all should be so willing to share knowledge.
Thanks for a great lesson for guitar, and life.
Fingerings can vary for sure. You should see how fast I can play an Ebm arpeggio, when I play ‘Round Midnight’ Wow… I couldn’t do it if I didn’t use slurs and slides! And that isn’t really ‘fingering’. Just play what feels comfy, and ‘muscle memory’ takes care of the rest. Good Luck… 🙂
excellent,allthough I wish you would show which fingers you use.I mean do you change position before each new lick
Hey, there are a number of ways to finger these so you can try a few out and see what fits best. In the licks, I used the same fingerings that I used for the arps, so once you get an arp fingering you like you can keep it for the licks.
It’s only taken me about 40 years! 🙂
So that’s how I get the Jazz sound! Well, now… And there was me fiddling with scales and wondering why I sounded as if I was extemporizing rather than jazzing! Thanks! Lol!
Thanks very useful.
I’ve been thinking about this for months !Working it out was a bit daunting Thankyou so much.!!!
Wow! This is a great lesson. I will be studying this for more than a few days!!
thank you Matt for giving & sharing your kindness god bless you man to say that much is never enough so…. LOVE FROM WILD MOTHER AFRICA …[email protected]..@….
Very useful for any guitarist ! Thank you very much !
Tnx it was usefull.
Exactly, what I need now. Thanks. Martin