
-
The FrankenTele lives!
I bought a Telecaster about a decade ago from a young kid needing money for college. It was supposed to have started life as a MIM Tele, but it had a Warmoth neck and Seymour Duncan pickups (Alnico 2 in the neck, Quarter Pounder in the bridge). Played and sounded great. I spent $150–one of the better buys I’ve made. He had started a reliccing project with it, but got tired of working on it and left it partially done.

Fast forward a year or so later, I decided to upgrade it, so got a 3-burst paulownia body from GFS (very light) and added a tremolo and some new knobs.

More recently I wasn’t playing it a lot, and the electronics were wonky—lots of noise, volume pot not working. I was going to sell it on consignment, but the local shop wouldn’t take it with its issues.

So then I got an idea—I still have the original body, which I think is Swamp Ash—why don’t I strip it, stain it and redo it to sell at a fundraising auction for my high school (I generally make a number of pens and cutting boards with school colors/logos to sell—last year sold over $1000 of stuff)? Will need to be BLUE, as my school’s nickname is Big Blue. And while I’m at it, change out the wiring harness with something reliable.
-
-
Stripping the old body was, not unexpectedly, a fair amount of work. I used some non-toxic stripper gel on the top, required 3 applications and I was still not down to the original topcoat.

So I got out the trusty belt sander and went at it. Took all the coats off the back with the belt sander. Very, very messy of course even with the vacuum hooked up.
And it required getting a new tool—an oscillating spindle/belt sander by Triton (Triton - Oscillating Spindle & Belt Sander - 450W 3.5A - Model TSPST450) to sand the curves. (I needed it for another project anyway.)


Got it finally cleaned up, just need to finish sand it.
I am planning to apply some TransTint blue dye (mixed with denatured alcohol), and then will finish it with ColorTone wipe-on poly.
I don’t have a spray setup. I was thinking of getting aerosol NC lacquer, but in the end it would cost too much (>$150), vs $34. Plus thinking of this as a “student” guitar, poly is more durable.
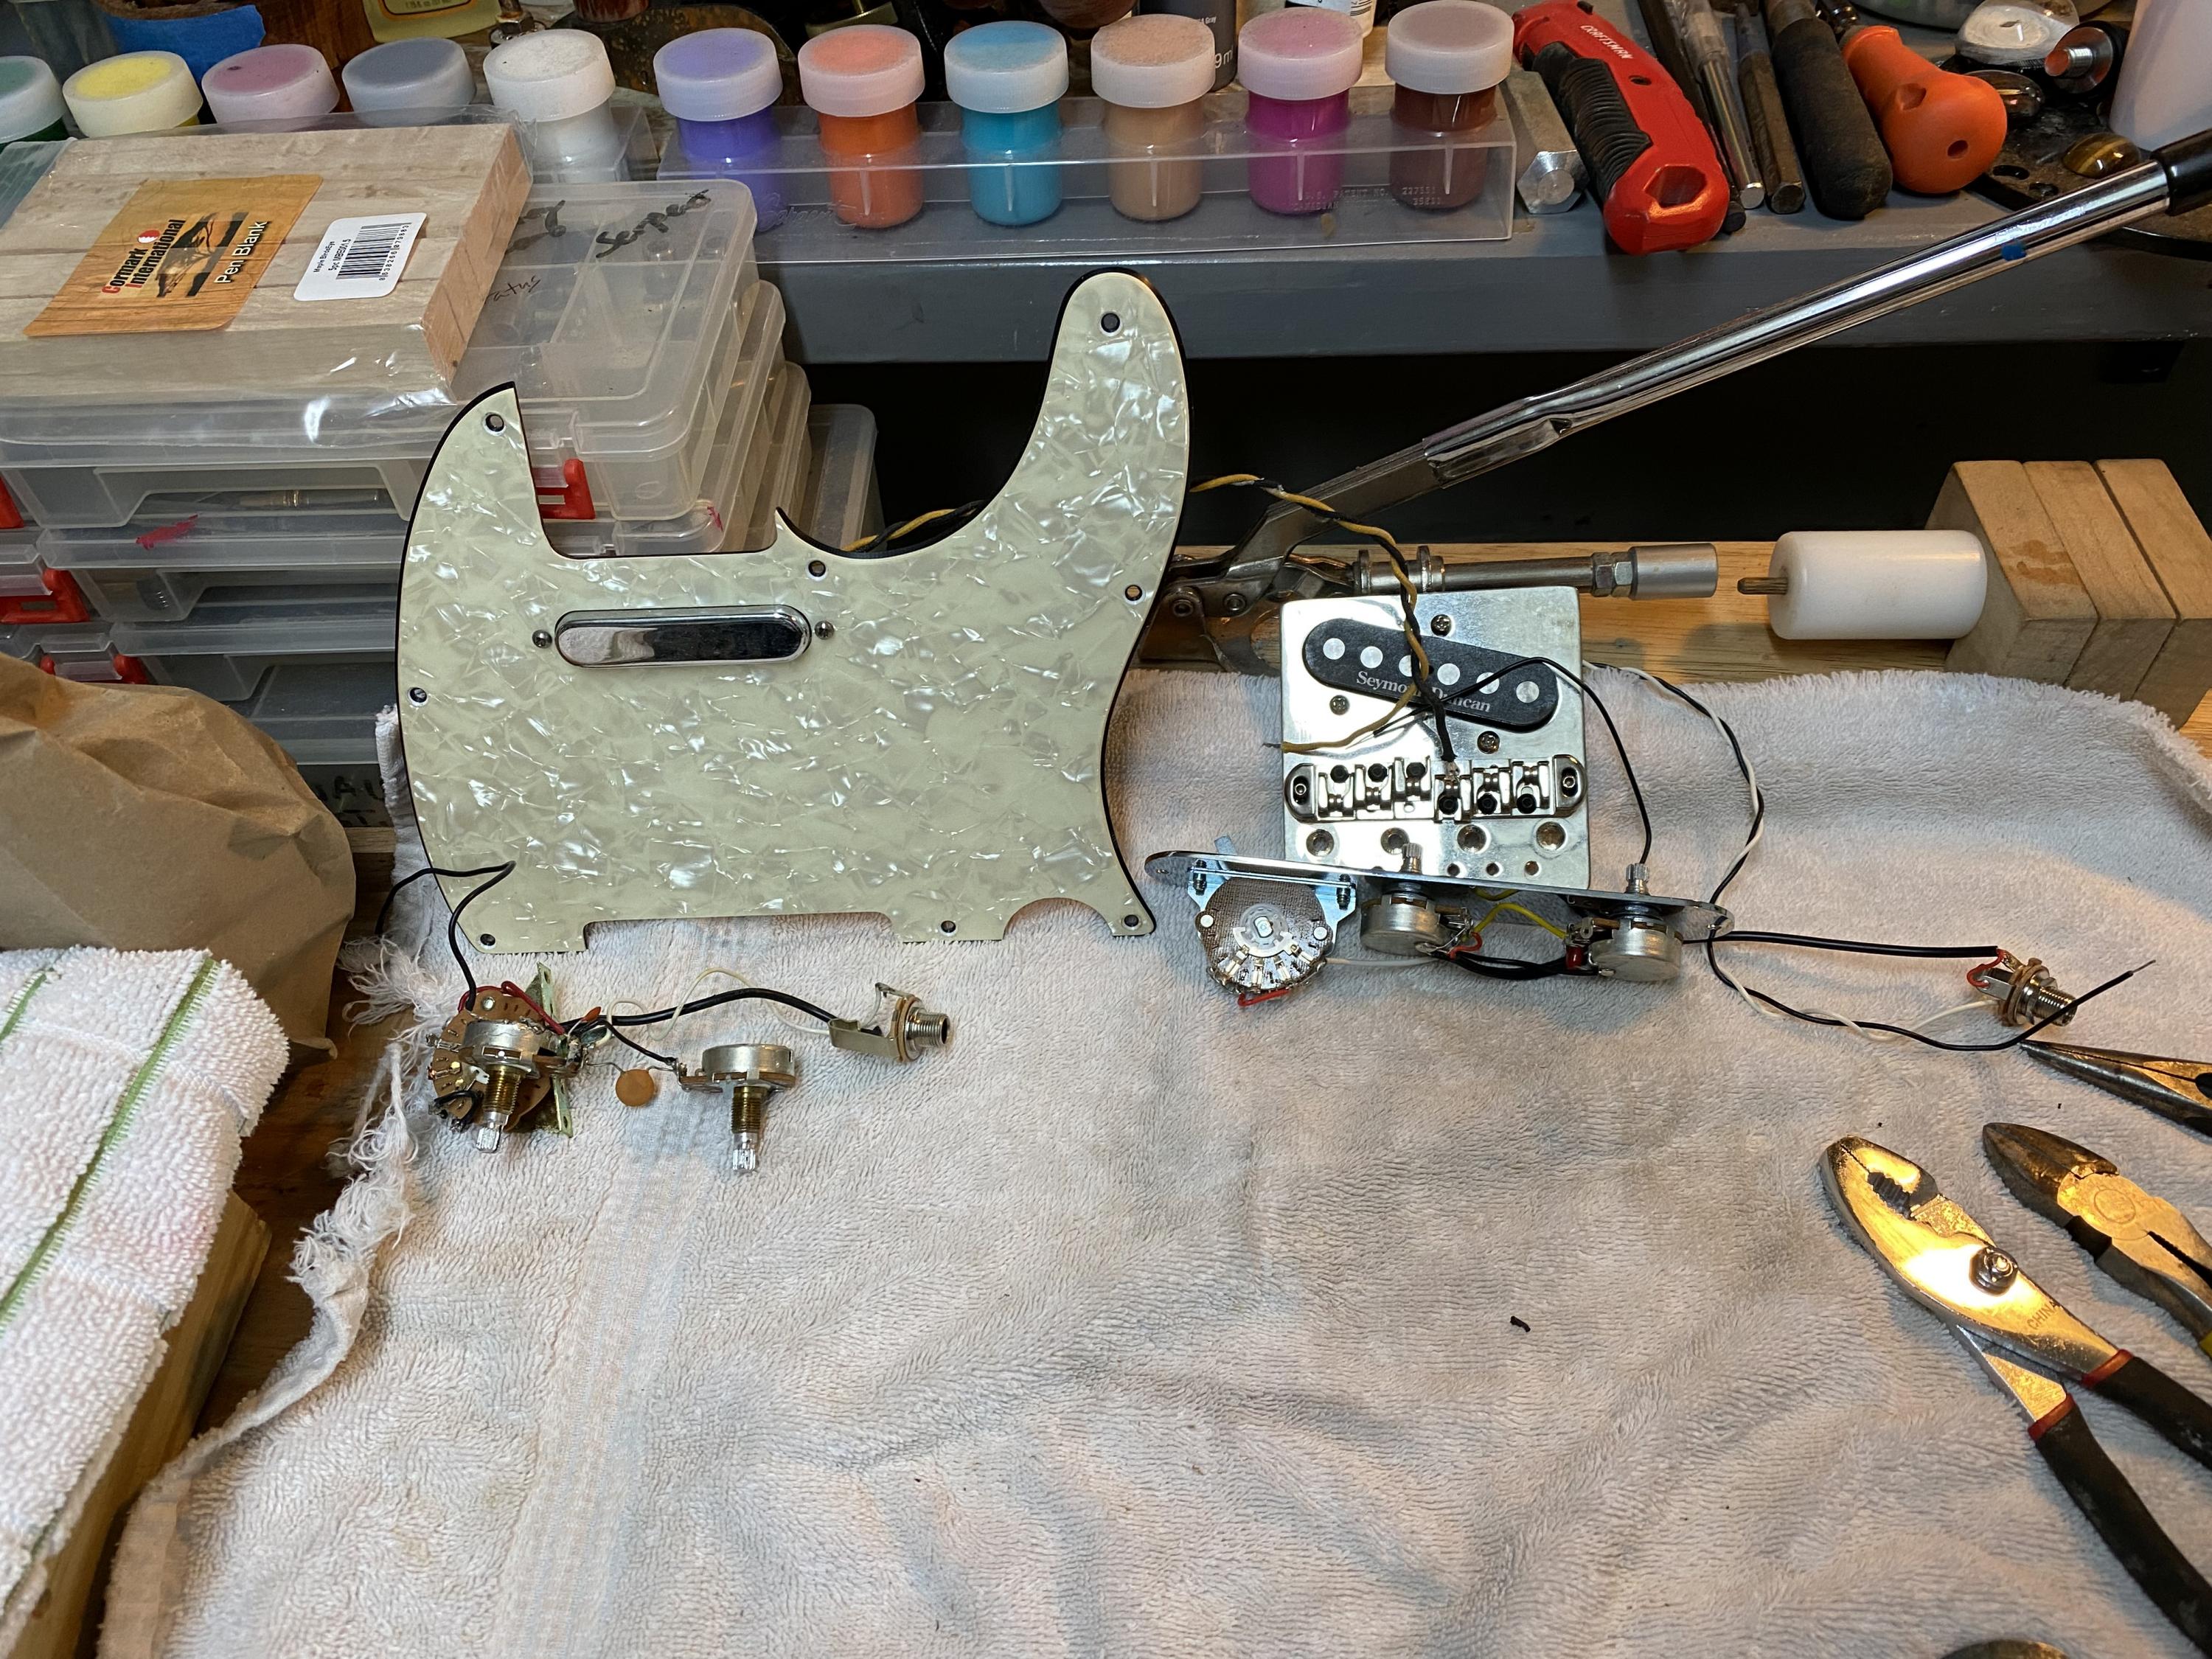
Got the wiring harness all ready to go—new harness (GFS prewired) on the right, old one on the left.
Anyway will post some more pics as it goes along.
-
If this works out as planned, I may start making kit Teles on a more regular basis to sell at auction or donate to local schools.
Always fun to combine 2 hobbies—guitar and woodworking—in one.
-
I made a sort of boo-boo. I was sanding it down and noticed that the edges on the backside looked “worn”. Turns out it was a veneer, and I had sanded through the veneer on the edges.
That surprised me. Of course, when I bought the guitar, it had 2 extra coats of paint on it, so I had no idea. And the top of the guitar looked pretty nice—glued-up slabs, but still with a nice grain pattern. No veneer on that one.
I should have guessed the figure on the back was too nice to have been regular old swamp ash boards.
Rather than live with some imperfection on the edges, I ran it through the planer and sanded the veneer off. Looks pretty good in its natural state.
I finish-sanded it and am ready to dye it blue. If I don’t like it, I always have the option of painting it a solid color.
Here it is with the hardware and neck in rough position. If I were making it for myself, I’d leave it natural and finish it with some Danish oil. But for the auction—blue it shall be.

-
Is it alder with a swamp ash veneer on the back??
-
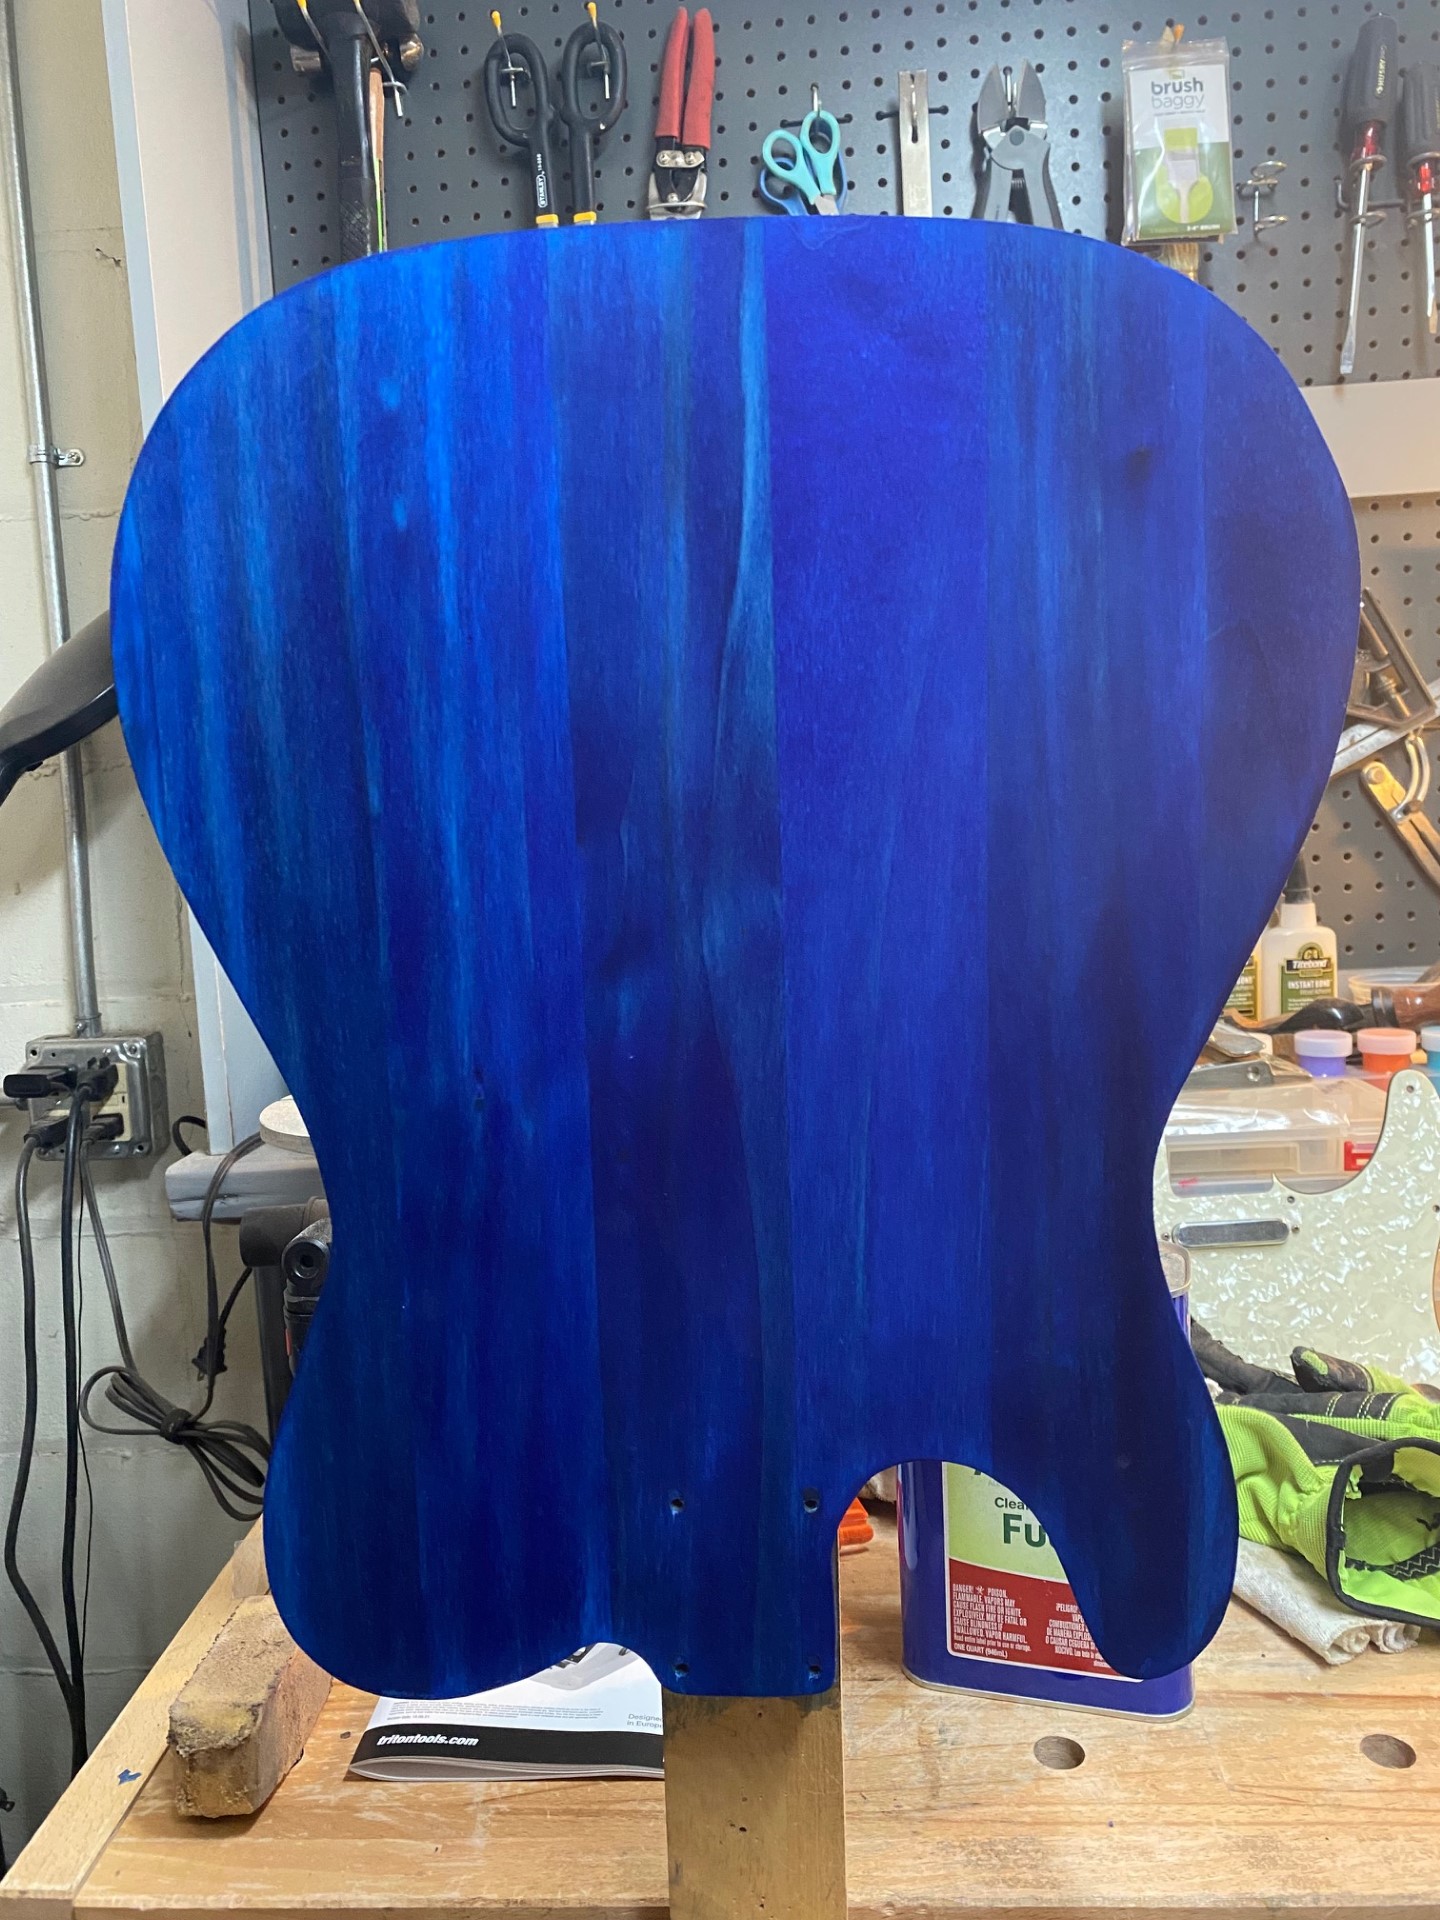
After finish sanding I dyed the wood with TransTint blue using denatured alcohol as a solvent. After the first application, I sanded down the top and back to remove most of the dye before dying again.
I think it turned out pretty well. I am going to put some poly on it this week, and will see how I like the finished product. For the future I might put on a veneer before staining, or get a prefinished body from GFS--their Lake Placid blue (alder) looks pretty awesome, and only $90, so not a huge expense.

-

9 coats of poly. That should be enough!
I think it looks pretty good for a FrankenTele. Another day to cure (7 days) then will polish and buff it out tomorrow.
I ordered parts from GFS to make another one, in Lake Placid Blue (alder body). The electronics are plug-n-play. Will be similar to the above, except rosewood fretboard, no tremolo, and solid color. Cost about $350 altogether.
Can I get a Tele knock-off cheaper? Yes, but it won’t be “made by me”. I plan to donate both of these to a high school fundraising auction.
After this I may get a kit from Stew Mac and either add a veneer or make my own body. We’ll see.
-
Well, I was *THIS* close...
After a week of curing, I denibbed the poly with steel wool, then wet sanded from 1000 to 2000. I then used some Meguiars rubbing compound (recommended in various places) with a foam pad on my right angle drill to rub it down. The front and sides looked great. However, on the back along the lower bout there was a dime-sized area that looked dull and fuzzy. I used more rubbing compound, and it got bigger! Now it's a couple of centimeters in diameter...
(Sorry I don't have a pic right now.)
Not sure what happened. It could have been a blob where the poly didn't completely cure. Or maybe I sanded through too much of the poly (9 coats--applied with at least 3 hours in between, 70 degrees in the shop).
So I am gonna touch up that area with a few more coats of poly and see how it looks when I rub it out. (Yes I'm aware it may not blend in perfectly.)
The ultimate plan is to use Meguiars polishing then a scratch remover (I have Wizards--recommended to me by Dave Rogers). Then reassemble the guitar.
If I can't fix this booboo, I may have to take off the poly down to bare wood, possiby re-dye, and start putting poly on again.
What I've learned from woodworking over the years is never take the finishing part for granted. Gremlins can always occur. And IME usually do LOL.
-
Amazing work. I got some 3pac stuff for cheap to make the (karri) wood look shiny woody. Hopefully easier than the poly!!!
Harnesses should stay ok but pots rust and only replacement is worth the time but soldering wire to the pot’s body is a pain (for me).
Good luck!
Sent from my iPhone using Tapatalk


 Reply With Quote


Melody between melody
Today, 03:25 AM in Chord-Melody