
-
01-29-2015, 01:07 AM
#151
Wow! I haven't been here for a while. It's coming along beautifully. I really like it's looks, very classy.
I probably missed it so forgive me if you've already said but what are you going to use for a finish?
-
-
01-30-2015, 11:51 AM
#152
I did my first woodworking class last year with the intention of eventually building instruments. I had so much trouble with hand planing and everything in general. The power tools were a bit easier but scary at first! I was easily the worst student in the class. I'm blown away by your skills and attention to detail. It's also fascinating to see a full journey from "wood to tunes". Thanks for sharing.
-
02-01-2015, 10:38 PM
#153
Thanks, Scot. I originally planned to give French polishing a go, but with a few flaws that I'd prefer to downplay rather than magnify, I've now settled on a hand-rubbed tobacco burst. We'll see how that goes. I'll seal the dye with dewaxed shellac and then clear coat it with a brush-on varnish recommended by a builder whose opinion I trust.
If I keep at this, I'll eventually invest in spray equipment, but that's a big jump for me at the moment.
seaguitar -- Keep at it! Once you have some basics down the world sort of opens up for you. It really doesn't take that long to get a few fundamentals that allow you to do a lot. Having someone show you how to properly sharpen your tools is probably the thing that will make the biggest difference early on.
-
02-02-2015, 12:05 AM
#154
I use hand applied Shellac for my all instruments, some french polishing some brushed shellac. I know many guys like a good sprayed nitro-lacquer but I still think there's nothing like Shellac or a fine oil (violin style) varnish. Something about that hand applied finish that one just cannot get with a spray gun...
-
02-02-2015, 06:47 PM
#155
That's encouraging, Scot. My inclination is toward hand application, especially with friendly substances like shellac. I will probably avoid nitro altogether if I can help it. It's toxic (and possibly explodey) to the builder, and it's toxic to the environment. Any finish that has cracking (sorry... 'checking') as a standard feature is flawed, in my opinion.
-
02-02-2015, 07:21 PM
#156
There are some excellent padding/brushing lacquers if you search them out. They are still toxic but not nearly so bad as the sprayed stuff. I occasionally use the Deft Clear Wood Finish Brushing Lacquer if I have a client with toxic body chemistry...especially on the neck. If you mix it 75% lacquer/25% shellac it works well for padding or brushing. I always find I need to buff it out a little when it cures to get rid of some of the pad or brush marks but some folks using it constantly have the technique down to get that glass smooth finish without buffing. Something to strive for, I guess.
But my go to finish is a good french polish. Once you get the feel for it it's easy to do, gives a beautiful natural finish and is easy to fix if issues arise or the client (or yourself) marks it...not such an easy thing to do with nitro.
I have no idea how experienced you are with shellac and French Polishing but if you need a few tips don't hesitate to ask. I'll answer truthfully when I know and if I don't know, I'll make up something convincing...
-
02-03-2015, 01:44 PM
#157
I did a "Tru-oil gun stock finish" on a les paul,
very easy to apply.
As you apply it with 400, 600, and at last 1200 paper, the finish is smooth and superb.
You take no risk to order one bottle, and try it on a piece of wood, investment cost is not expensive.
It made me think I should have tried Frensh Polishing.
Again, french polish Shellac and alcohol are not expensive regarding a good spraygun,
(what is expensive for a Pro is time, but a hobyist have lot of time)
I bought one and did some bodywork for my motorcycles in the past ,
I think the total cost of a Shellac kit would be near the same as only one liter of good solvant/hardener
and you need to add lacker, spraygun, air compressor , water filter/trapping device etc...
christophe
Last edited by ninjasan; 02-17-2015 at 05:44 AM.
-
02-04-2015, 11:12 PM
#158
Scot -- I have a bit of experience with shellac generally, but not with french polishing. I do want to move toward that, so I will more than likely aim to give it a go for my second build. (I haven't learned my lesson yet!) I will surely be pestering you with some silly questions, like "Why is my arm so tired?" and "Am I finished yet?"
Christophe -- Yes, I've heard lots of good things about Tru-oil. I've already collected the materials for my current plan, so we'll see how I go. (Of course I will test on scrap first, so I may move to a Plan B anyway.) Very nice work on the... erm... motorcycle part. 'Fuselage' is the term that springs to mind, but I'm sure that's not it!
-
02-08-2015, 04:13 AM
#159
So I finally was able to string her up, and lo' and behold, she sounds like a guitar! David warned me about reserving judgment, but I was actually quite impressed right out of the gates. Probably the same way one is proud of one's homely child, but nevertheless.
I left it strung up for about two weeks, and the sound did improve into something respectable. It is quite loud, as I suspected it would be, but still a bit tight sounding, boomy, and overly mid-focused. I'm hoping the upper end of the spectrum will come out more in time. I had Martin 80/20 bronze on there, and I'm not sure those are the right strings for this guitar. Sorry, I did not record any samples, but I will once it's finished, I promise!
But in order to string it up, I needed a few things. First up, I made a tailpiece out of Puriri (the same wood as the fretboard and head plates):

Then I roughed out the bridge and fit it to the top:
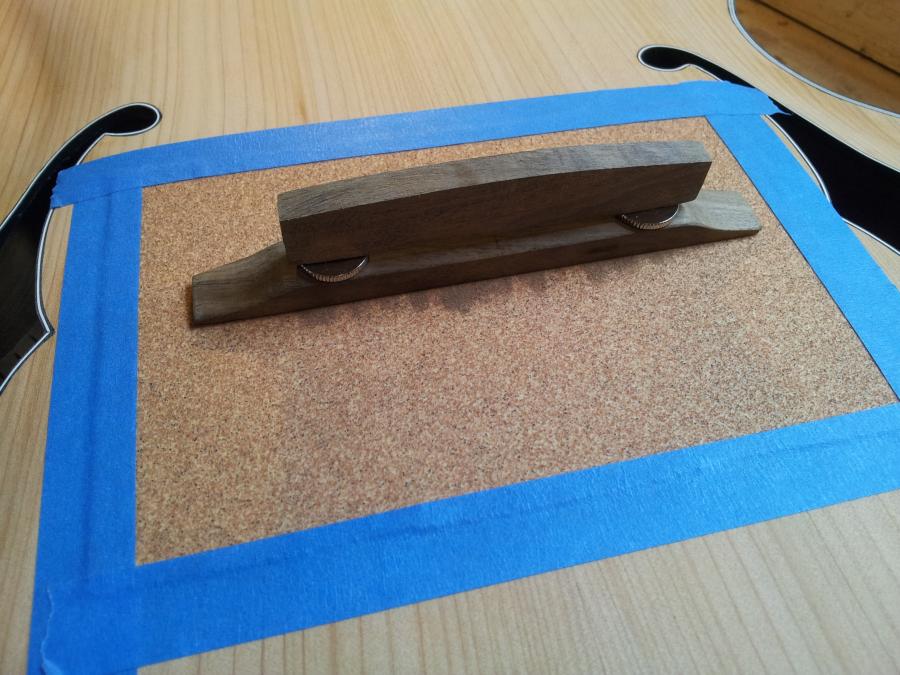
I used snippings of a paperclip to find the compensation for each string...

... and chiseled and sanded the saddle to the resulting shape. Here is the result after a light coat of beeswax.

In my silliness, I forgot to take a picture of it strung up in the white, so you'll have to use your imagination. I also don't have pictures of me levelling and dressing the frets, but just search for Jazzbow's pics and pretend they're mine. 
Last edited by Jehu; 02-08-2015 at 04:16 AM.
-
02-11-2015, 03:49 PM
#160
What a great thread, thanks for documenting your build.
Good job with the Puriri - I've been holding my breath waiting for for you to find a moth hole!
Adam
-
02-15-2015, 09:07 PM
#161
Thanks, Plukky... so far so good on the moth front! (I didn't realise that was a problem with Puriri, but my wood guy is pretty good, so I'm sure if he sent me a fingerboard blank with a hole I would get a replacement.)
-
03-13-2015, 12:24 AM
#162
The wait is over, folks! Some pics here:
https://www.jazzguitar.be/forum/guita...tml#post510819
... but here's a teaser:

The finish was a bit of an adventure. I was trying for a hand-rubbed tobacco burst, but the stain turned out a little bit different once the top coats were on. A little closer to a honey-ish violin burst, perhaps? I'm not objecting, I think it turned out quite nice, if somewhat blotchy in spots. I'm not totally happy with the topcoats on the top. They don't show up in the photos, but there are a few pretty obvious finish flaws. I will probably come back to it at some point and try to fix it (or redo it), but for now I think I'm just going to enjoy my new guitar for a while!
As I mentioned earlier in the thread, I was using this project as a learning tool, and tried to do as many things as possible without going completely over the top -- cutaway; homemade kerfing; binding the f-holes, fretboard, and headstock; inlaying; something resembling a backstrap; etc. The result has been a fairly dramatic increase in confidence when using all sorts of hand tools, and I've been forced to think about a lot of aspects of instrument design that would otherwise have never crossed my mind.
An enormous, sincere thank you to all of you who have supported me during this project Especially the luthiers -- your expertise and guidance has helped me avoid many a pitfall!
-
03-13-2015, 04:31 AM
#163
-
03-14-2015, 07:49 PM
#164
Yeah, man! It looks great....(starts slow clap)
-
03-15-2015, 12:49 AM
#165
Thanks so much for the all the pics and explanations. Truly inspirational. Makes me want to get off my duff and try.
As an aside, I had no idea puriri was so dense. Not quite in cocobolo or lignum vitae range but almost the same as Indian ebony it appears.
-
03-15-2015, 08:15 PM
#166
Give it a go, travisty! Yes, Puriri is tough stuff, but actually pretty easy to work it. It planes nicely. (Though I haven't tried bending it yet.)
Thanks Jason, a big compliment coming from you, even if you're just being polite.
-
03-15-2015, 11:24 PM
#167
While I do always try to be polite, I meant it. I know how hard these things are to build and you did a great job.
-
03-15-2015, 11:56 PM
#168
Looks very nice, how much does it weigh?
-
03-16-2015, 10:21 PM
#169
I don't have a scale, but it seems to be about the same or maybe very slightly lighter (to me; my wife couldn't feel a difference) than my 2-pickup Kingpin, which is supposedly 5lb 5oz (2.4kg).
-
05-09-2015, 12:22 AM
#170
I don't mean to alarm anyone, but contrary to all logic and sense, it has begun again...

-
05-09-2015, 01:05 AM
#171
Making guitars is just like eating potato chips, you just cannot stop at one!
-
05-09-2015, 01:33 AM
#172
Great !
What are the woods choosen for that one ?
christophe
-
05-09-2015, 01:54 AM
#173
Jehu,
I hope you start another thread called "Against All Logic, It Begins Again".
The build thread for your first was great to read. This looks different and probably deserves its own thread.
Good building! Looks great already.
I too am curious about the woods. They book look evergreen-y. The top plate looks vaguely like yew - which I would have figured was a bit heavy - or possibly cypress. The back escapes me. That almost looks cypress-y too, but flat-sawn from a very large tree.
-
05-10-2015, 03:11 AM
#174
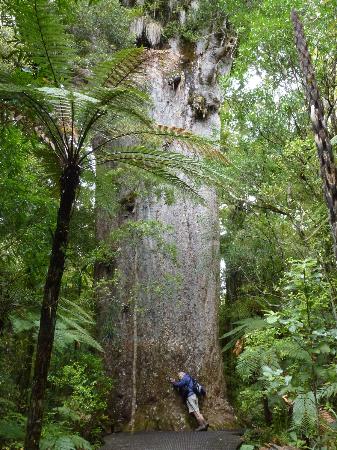
Interesting guesses! The top on this is a native New Zealand timber called Kauri, obviously rift sawn (but pretty cool looking!). It came out of renovations on a century-old villa, so it will be well seasoned. And it will have been from a very large tree indeed -- the Kauri are known as NZ's "forest giants":
The back and sides are Tulip Tree, which is from the magnolia family and is quite a hard wood. The neck will be Rimu (another native timber), and the fretboard and fittings will be Puriri as with the previous build.
This one will be a birthday gift for my father, assuming I can get it done in time to visit him later this year.
-
05-10-2015, 05:07 AM
#175
Thanks Jehu. I was going to say kauri for the top but I almost always see straighter grain. The back looked flat sawn to me. If that is rift sawn it must grow like nothing I've ever heard of.


 Reply With Quote


5 Guitars - Neck Pickup - Jazzblues: Danocaster,...
Today, 04:40 AM in Guitar, Amps & Gizmos